| Feature | Data Lake Storage Gen1 | Data Lake Storage Gen2 |
|---|---|---|
| Architecture | Standalone hierarchical file system | Built on Azure Blob Storage with Hierarchical Namespace (HNS) |
| Performance | Slower due to standalone architecture | Optimized performance with tiered storage & caching |
| Security | ACLs (Access Control Lists) & RBAC | RBAC, ACLs, Azure AD (more granular access control) |
| Cost Efficiency | Higher cost, no tiered storage | Lower cost with hot, cool, and archive tiers |
| Integration | Limited compatibility with Azure services | Fully compatible with Blob APIs, Synapse, Databricks, Spark |
| Scalability | Limited to single-region storage | Globally distributed, supports Geo-redundancy (GRS) |
| Protocol Support | Proprietary protocol, limited interoperability | Supports HDFS, Blob APIs, better integration with analytics tools |
| Availability | Regional storage only | Supports multi-region & geo-redundant storage |
| Migration | No easy migration to Blob storage | Can integrate with Azure Blob Storage, simplifying migration |
| Support Status | Deprecated (support ends Feb 29, 2024) | Actively developed & recommended for new workloads |
PySpark Vs Pandas

df.count()– Returns the count of each column (the count includes only non-null values).df.corr()– Returns the correlation between columns in a data frame.df.head(n)– Returns first n rows from the top.df.max()– Returns the maximum of each column.df.mean()– Returns the mean of each column.df.median()– Returns the median of each column.df.min()– Returns the minimum value in each column.df.std()– Returns the standard deviation of each columndf.tail(n)– Returns last n rows.
df.select()– Choose specific columns from a DataFrame.df.filter()– Filter rows based on a condition.df.groupBy()– Group rows based on one or more columns.df.agg()– Perform aggregate functions (e.g., sum, average) on grouped data.df.orderBy()– Sort rows based on one or more columns.df.dropDuplicates()– Remove duplicate rows from the DataFrame.df.withColumn()– Add a new column or replace an existing column with modified data.df.drop()– Remove one or more columns from the DataFrame.df.join()– Merge two DataFrames based on a common column or index.df.pivot()– Pivot the DataFrame to reorganize data based on column values.
How to Use Let’s Encrypt on Windows Server with IIS
This guide explains how to enable a FREE SSL certificate using Let’s Encrypt on a Windows Server running IIS. Specifically, it addresses the challenges of using wildcard certificates for multiple websites with different domains and subdomains.
Scenario:
You have a Windows Server 2019 with IIS 10, a single IP address, and multiple HTTPS websites hosted with different domain names. For subdomains under the same primary domain (like *.example.com), a wildcard certificate works perfectly. However, complications arise when adding websites from different domains, such as mydomain.com.
Initial Setup Example:
IIS 10 hosts the following sites:
- ABC Server (Website)
abc.api.example.com– HTTPS @ 443
- ABC Client (Website)
abc.example.com– HTTPS @ 443bcd.example.com– HTTPS @ 443cde.example.com– HTTPS @ 443admin.example.com– HTTPS @ 443
- XYZ App (Website)
xyz.example.com– HTTPS @ 443
- SEQ (Website)
seq.mydomain.com– HTTPS @ 443
Managing these SSL certificates with multiple domain names can be tricky, but Let’s Encrypt simplifies the process.
Steps to Enable Let’s Encrypt SSL on IIS
- Enable IIS and Create the
.well-knownFolder- Follow this guide to create the
.well-knowndirectory for SSL validation- Create a folder on the C drive named
well-known. Inside, create another folder calledpki-validation. Example:C:\well-known\pki-validation. - Place the required validation file in the
pki-validationfolder. - Open IIS Manager and for each site, right-click and select Add Virtual Directory.
- In the Alias field, enter
.well-known. In the Physical Path field, enter the path to the folder you created, e.g.,C:\well-known\pki-validation. - Confirm with OK. The folder and files should now be accessible via the web.
- Create a folder on the C drive named
- Follow this guide to create the
- Set Proper Permissions for the
C:\well-known\pki-validationFolder- Follow this IIS 403 Forbidden solution:
- Right-click the
.well-knownfolder and select Properties.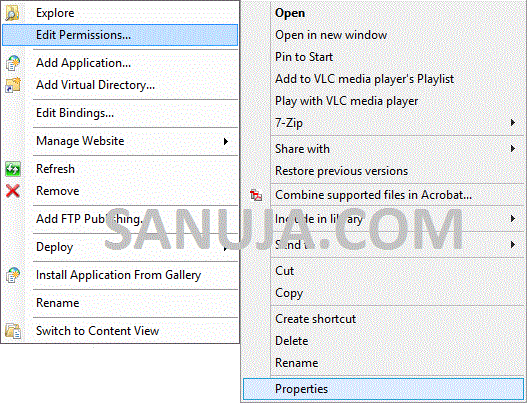
- Navigate to the Security tab.
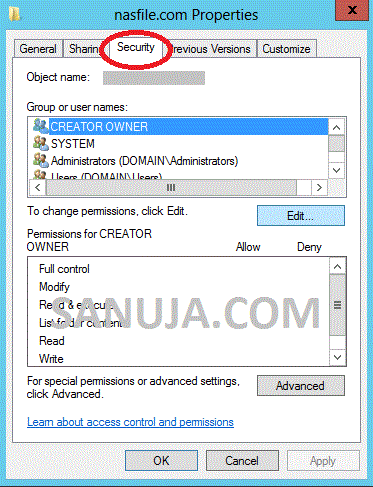
- Click Edit and ensure
IIS_IUSRSis listed. If not, click Add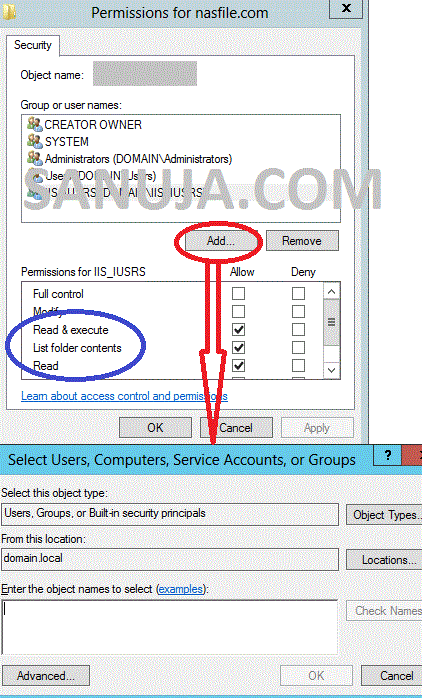
- In the Enter the object names box, type
IIS_IUSRSand click OK. - Set Read & execute, List folder contents, and Read permissions for
IIS_IUSRS.
- Right-click the
- Follow this IIS 403 Forbidden solution:
- Validate DNS Entries for Each Domain/Subdomain
- Use a tool like Google Dig to validate DNS entries for the following domains:
- abc.api.example.com
- abc.example.com
- bcd.example.com
- cde.example.com
- admim.example.com
- xyz.example.com
- seq.mydomain.com
- Use a tool like Google Dig to validate DNS entries for the following domains:
- Download and Install win-acme
- Download win-acme from https://www.win-acme.com.
- After downloading, unblock the files and extract them to
C:\win-acme.
- Run win-acme to Generate SSL Certificates
- Navigate to
C:\win-acmeand runwin-acme.exeas Administrator. - Follow the prompts to select the appropriate site for which you want to generate the SSL certificate.
- Once complete, your sites will be secured with Let’s Encrypt SSL certificates.
- Navigate to
By following these steps, you can manage multiple websites with different domains and subdomains on a single IIS server with Let’s Encrypt SSL certificates, solving the issues typically associated with wildcard certificates for different domains.
Other Resources
Connecting and Downloading Kaggle Dataset from colab
Register https://www.kaggle.com and generate API token via https://www.kaggle.com/settings
# Run this cell and select the kaggle.json file downloaded
# from the Kaggle account settings page.

from google.colab import files
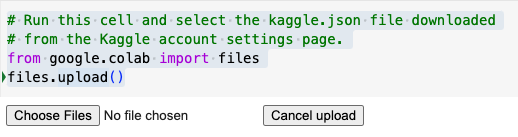
files.upload()

# This will prompt the file upload control, so that we can uppload the file to the temporark work space.
# Next, install the Kaggle API client.
!pip install -q kaggle

# The Kaggle API client expects this file to be in ~/.kaggle, so move it there.
!mkdir -p ~/.kaggle
!cp kaggle.json ~/.kaggle/

# This permissions change avoids a warning on Kaggle tool startup.
!chmod 600 ~/.kaggle/kaggle.json

# Searching for dataset
!kaggle datasets list -s dogbreedidfromcomp

# Downloading dataset in the current directory
!kaggle datasets download catherinehorng/dogbreedidfromcomp

# Unzipping downloaded file and removing unusable file
!unzip dog_dataset/dogbreedidfromcomp.zip -d dog_dataset
SelfSigned Certificate for WebApplications (PowerSchool Test Server)
When we are creating a PowerSchool in OnPrimise, One of the difficult part is to generate a proper self-signed certificate. This blog is for all the PowerSchool administrators out there who have to Build the PowerSchool Test server or they want to Dump the Latest database backup to the test server.
OpenSSL
commonly we use OpenSSL to generate the certificate, by default OpenSSL is not available in Windows Server. Below are the steps (Credits to: https://tecadmin.net/install-openssl-on-windows)
Step 1 – Download OpenSSL Binary
You need to download the latest OpenSSL Windows installer file. Click the below link to visit the OpenSSL download page https://slproweb.com/products/Win32OpenSSL.html
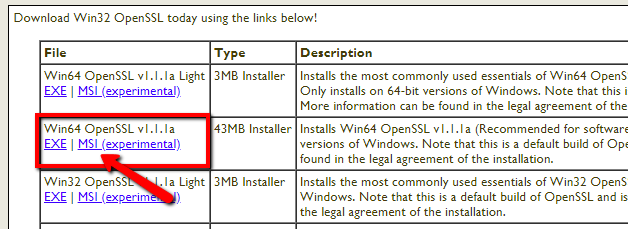
Step 2 – Run OpenSSL Installer
Now run the OpenSSL installer on your system. The OpenSSL required Microsoft Visual C++ to be installed on your system. If your system doesn’t have Microsoft Visual C++ installed, the installer will show your message like:
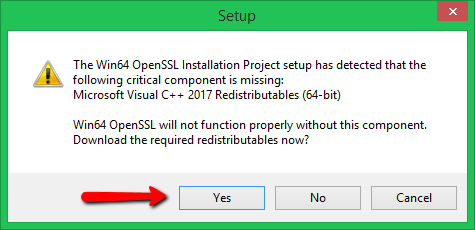
Click Yes to download and install required Microsoft Visual C++ package on your system.
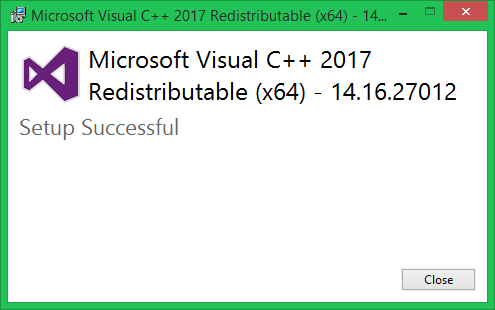
Then again run the OpenSSL installer and follow the wizard.
Make sure you change the folder to “C:\OpenSSL-Win64” for easy handling in later stage
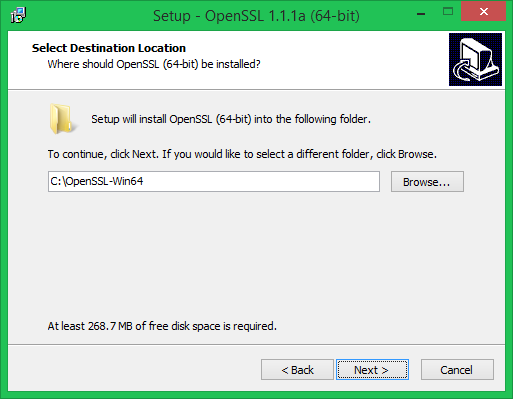
Step 3 – Setup Environment Variables
Now set the environment variables to function OpenSSL properly on your system. You are required to set OPENSSL_CONF and Path environment variables.
Use the following commands to set the environment for the permanently (use PowerShell):
[System.Environment]::SetEnvironmentVariable('OPENSSL_CONF','C:\OpenSSL-Win64\bin\openssl.cfg', 'Machine')
$Path = [Environment]::GetEnvironmentVariable('PATH', 'Machine') + [IO.Path]::PathSeparator + 'C:\OpenSSL-Win64\bin'
[System.Environment]::SetEnvironmentVariable('Path',$Path, 'Machine')
Step 4 – Run OpenSSL Binary
Open cmd / powershell and test ‘openssl’
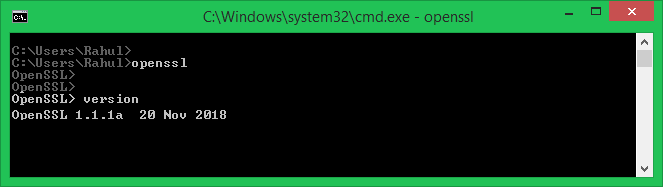
Generating Self-Signed certificate via OpenSSL
Please change the below names according to your situations
(credits to https://stackoverflow.com/questions/10175812/how-to-generate-a-self-signed-ssl-certificate-using-openssl)
- powerschool.local.school => to your test server FQDN
- -subj “/C=BH/ST=Riffa/……CN=powerschool.local.school” => to your version
- subjectAltName => alter DNS and IP to match your server settings
# generate selfsigned certificate and key for 10 years with specific Subject and Additional subjectAltName

openssl req -x509 -newkey rsa:4096 -sha256 -days 3650 \
  -nodes -keyout powerschool.local.school.key -out powerschool.local.school.crt -subj "/C=BH/ST=Riffa/L=Riffa/O=School/OU=PowerSchool/emailAddress=prince@xxxxxxx.com/CN=powerschool.local.school" \
  -addext "subjectAltName=DNS:powerschool.local.school,DNS:powerschool-altername.local.school,IP:172.10.1.151,IP:172.10.1.152"
the above code process will generate the key file in the modern format (PKCS#8), which PowerSchool doesn’t like. We need to manually convert the key file to traditional format (PKCS#1)
# traditional format (pkcs1)
$ cat pkcs1.pem
-----BEGIN RSA PRIVATE KEY-----
...
-----END RSA PRIVATE KEY-----
# modern format (pkcs8)
$ cat pkcs1.pem
-----BEGIN PRIVATE KEY-----
...
-----END PRIVATE KEY-----
# Convert from PKCS#8 to PKCS#1:
openssl pkey -in powerschool.local.school.key -traditional -out powerschool.local.school.rsa.key
The above code will generate a new key file (‘powerschool.local.school.rsa.key’) from your available modern key file (‘powerschool.local.school.key’)
Additional usefull commands
# Convert from PKCS#1 to PKCS#8:
openssl pkey -in pkcs1.pem -out pkcs8.pem

# Convert from PKCS#8 to PKCS#1:
openssl pkey -in pkcs8.pem -traditional -out pkcs1.pem

# RSA private key - To convert from PKCS#1 to PKCS#8:
openssl pkcs8 -topk8 -inform pem -in private_pkcs1.pem -outform pem -nocrypt \
 -out private_pkcs8.pem

# RSA private key - To convert from PKCS#8 to PKCS#1:
openssl rsa -in private_pkcs8.pem -out private_pkcs1.pem

# RSA public key - To convert from PKCS#8 to PKCS#1:
openssl rsa -pubin -in public_pkcs8.pem -RSAPublicKey_out -out public_pkcs1.pem

# RSA public key - To convert from PKCS#1 to PKCS#8:
openssl rsa -RSAPublicKey_in -in public_pkcs1.pem -pubout -out public_pkcs8.pem

# Create SSL identity file in PKCS12
openssl pkcs12 -export -in example.com.crt -inkey example.com.key -out example.com.pfx

# Convert P12 into PEM
openssl pkcs12 -in powerschool.local.school.pfx -nocerts -nodes -out powerschool.local.school.key
openssl pkcs12 -in powerschool.local.school.pfx -clcerts -nokeys -out powerschool.local.school.crt
openssl pkey -in powerschool.local.school.key -traditional -out powerschool.local.school.rsa.key
Additional Readings
Student Individual Learning Planner (SILP)
Dated: 10/Apr/2023
Developer: Prince Park, A Fatima
For School: American School of Bahrain
Department: SEN/Learning Support
Data Scientist With Microsoft
https://learn.microsoft.com/en-us/users/princeparkyohannanhotmail-8262/transcript/dlmplcnz8w96op1
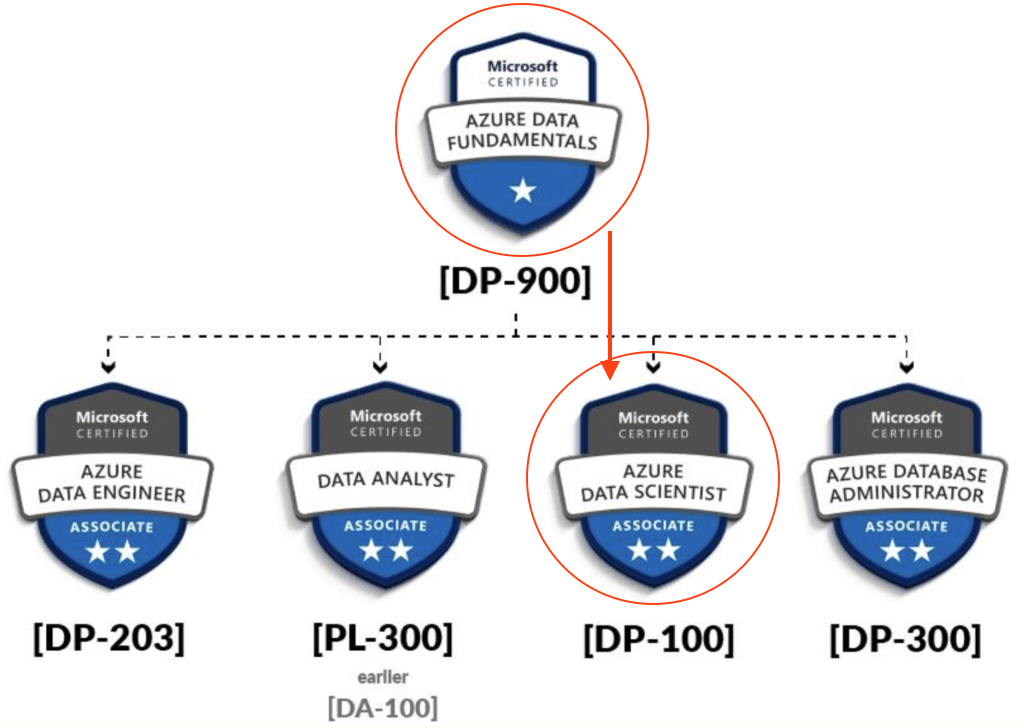
ASSOCIATE CERTIFICATION: Microsoft Certified: Azure Data Scientist Associate
CERTIFICATION EXAM: Designing and Implementing a Data Science Solution on Azure (Exam DP-100)
Data Scientist Career Path
- Learning Paths: Create machine learning models
- Option 1: Foundations of data science for machine learning (complete course)
- Module: Introduction to machine learning
- Module: Build classical machine learning models with supervised learning
- Module: Introduction to data for machine learning
- Module: Explore and analyze data with Python
- Module: Train and understand regression models in machine learning
- Module: Refine and test machine learning models
- Module: Train and evaluate regression models
- Module: Create and understand classification models in machine learning
- Module: Select and customize architectures and hyperparameters using random forest
- Module: Confusion matrix and data imbalances
- Module: Measure and optimize model performance with ROC and AUC
- Module: Train and evaluate classification models
- Module: Train and evaluate clustering models
- Module: Train and evaluate deep learning models
- Option 2: The Understand data science for machine learning (selected modules from option 1)
- Module: Introduction to machine learning
- Module: Build classical machine learning models with supervised learning
- Module: Introduction to data for machine learning
- Module: Train and understand regression models in machine learning
- Module: Refine and test machine learning models
- Module: Create and understand classification models in machine learning
- Module: Select and customize architectures and hyperparameters using random forest
- Module: Confusion matrix and data imbalances
- Module: Measure and optimize model performance with ROC and AUC
- Option 3: The Create machine learning models (selected modules from option 1)
- Option 1: Foundations of data science for machine learning (complete course)
- Learning Paths: Microsoft Azure AI Fundamentals: Explore visual tools for machine learning
- Learning Paths: Build and operate machine learning solutions with Azure Machine Learning
- Learning Paths: Build and operate machine learning solutions with Azure Databricks
COURSES
DP-090T00: Implementing a Machine Learning Solution with Microsoft Azure Databricks – Training
Azure Databricks is a cloud-scale platform for data analytics and machine learning. In this course, you’ll learn how to use Azure Databricks to explore, prepare, and model data; and integrate Databricks machine learning processes with Azure Machine Learning.
- Module: Get started with Azure Databricks
- Module: Work with data in Azure Databricks
- Module: Prepare data for machine learning with Azure Databricks
- Module: Train a machine learning model with Azure Databricks
- Module: Use MLflow to track experiments in Azure Databricks
- Module: Manage machine learning models in Azure Databricks
- Module: Track Azure Databricks experiments in Azure Machine Learning
- Module: Deploy Azure Databricks models in Azure Machine Learning
DP-100T01: Designing and Implementing a Data Science Solution on Azure
This course teaches you to leverage your existing knowledge of Python and machine learning to manage data ingestion and preparation, model training and deployment, and machine learning solution monitoring with Azure Machine Learning and MLflow.
- Module: Design a data ingestion strategy for machine learning projects
- Module: Design a machine learning model training solution
- Module: Design a model deployment solution
- Module: Explore Azure Machine Learning workspace resources and assets
- Module: Explore developer tools for workspace interaction
- Module: Make data available in Azure Machine Learning
- Module: Work with compute targets in Azure Machine Learning
- Module: Work with environments in Azure Machine Learning
- Module: Find the best classification model with Automated Machine Learning
- Module: Track model training in Jupyter notebooks with MLflow
- Module: Run a training script as a command job in Azure Machine Learning
- Module: Track model training with MLflow in jobs
- Module: Run pipelines in Azure Machine Learning
- Module: Perform hyperparameter tuning with Azure Machine Learning
- Module: Deploy a model to a managed online endpoint
- Module: Deploy a model to a batch endpoint
My Learnings.
# Calculate the number of empty cells in each column
# The following line consists of three commands. Try
# to think about how they work together to calculate
# the number of missing entries per column
missing_data = dataset.isnull().sum().to_frame()

# Rename column holding the sums
missing_data = missing_data.rename(columns={0:'Empty Cells'})

# Print the results
print(missing_data)

## OR
print(dataset.isnull().sum().to_frame().rename(columns={0:'Empty Cells'}))

# Show the missing value rows
dataset[dataset.isnull().any(axis=1)]
EDA
import pandas as pd

# Load data from a text file
!wget https://raw.githubusercontent.com/MicrosoftDocs/mslearn-introduction-to-machine-learning/main/Data/ml-basics/grades.csv
df_students = pd.read_csv('grades.csv',delimiter=',',header='infer')

# Remove any rows with missing data
df_students = df_students.dropna(axis=0, how='any')

# Calculate who passed, assuming '60' is the grade needed to pass
passes  = pd.Series(df_students['Grade'] >= 60)

# Save who passed to the Pandas dataframe
df_students = pd.concat([df_students, passes.rename("Pass")], axis=1)

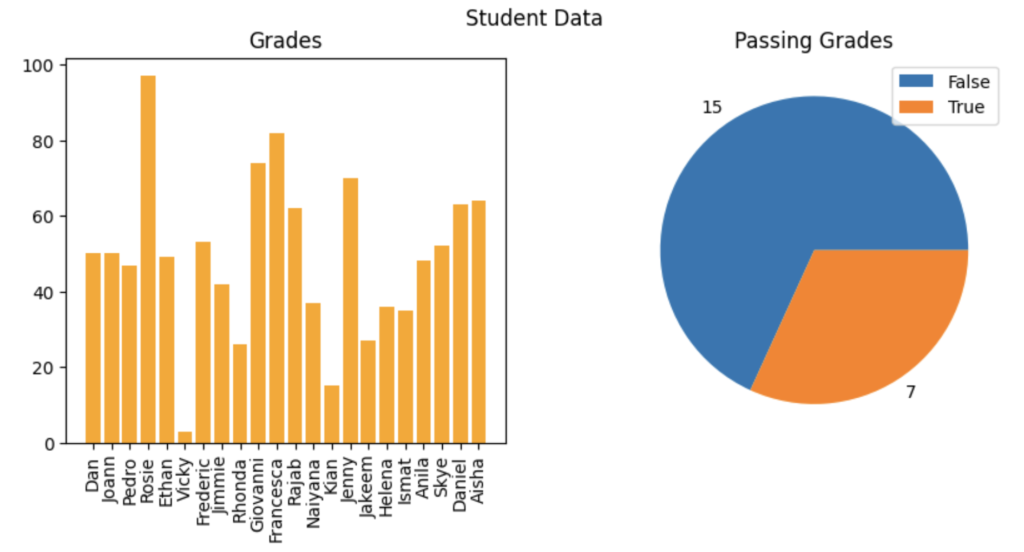
# Create a figure for 2 subplots (1 row, 2 columns)
fig, ax = plt.subplots(1, 2, figsize = (10,4))

# Create a bar plot of name vs grade on the first axis
ax[0].bar(x=df_students.Name, height=df_students.Grade, color='orange')
ax[0].set_title('Grades')
ax[0].set_xticklabels(df_students.Name, rotation=90)

# Create a pie chart of pass counts on the second axis
pass_counts = df_students['Pass'].value_counts()
ax[1].pie(pass_counts, labels=pass_counts)
ax[1].set_title('Passing Grades')
ax[1].legend(pass_counts.keys().tolist())

# Add a title to the Figure
fig.suptitle('Student Data')

# Show the figure
fig.show()
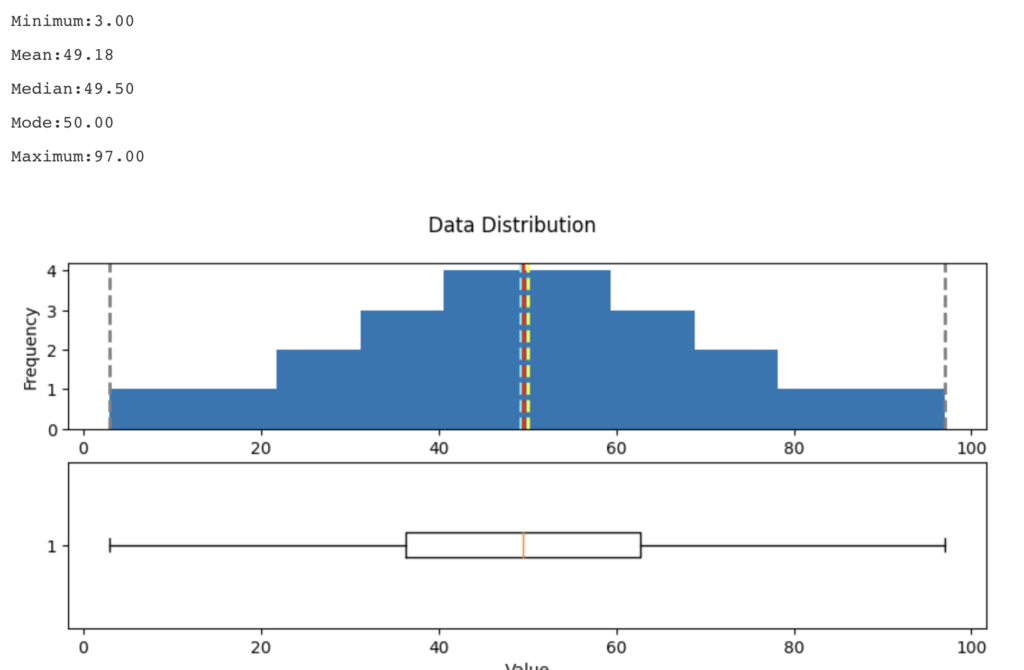
# Create a function that we can re-use
# Create a function that we can re-use
def show_distribution_with_quantile(var_data, quantile = 0):
    '''
    This function will make a distribution (graph) and display it
    '''

    if(quantile > 0){
        # calculate the quantile percentile
        q01 = var_data.quantile(quantile)
        print(f"quantile = {q01}")

        var_data = var_data[var_data>q01]
    }

    # Get statistics
    min_val = var_data.min()
    max_val = var_data.max()
    mean_val = var_data.mean()
    med_val = var_data.median()
    mod_val = var_data.mode()[0]

    print('Minimum:{:.2f}\nMean:{:.2f}\nMedian:{:.2f}\nMode:{:.2f}\nMaximum:{:.2f}\n'.format(min_val,
                                                                                            mean_val,
                                                                                            med_val,
                                                                                            mod_val,
                                                                                            max_val))

    # Create a figure for 2 subplots (2 rows, 1 column)
    fig, ax = plt.subplots(2, 1, figsize = (10,4))

    # Plot the histogram
    ax[0].hist(var_data)
    ax[0].set_ylabel('Frequency')

    # Add lines for the mean, median, and mode
    ax[0].axvline(x=min_val, color = 'gray', linestyle='dashed', linewidth = 2)
    ax[0].axvline(x=mean_val, color = 'cyan', linestyle='dashed', linewidth = 2)
    ax[0].axvline(x=med_val, color = 'red', linestyle='dashed', linewidth = 2)
    ax[0].axvline(x=mod_val, color = 'yellow', linestyle='dashed', linewidth = 2)
    ax[0].axvline(x=max_val, color = 'gray', linestyle='dashed', linewidth = 2)

    # Plot the boxplot
    ax[1].boxplot(var_data, vert=False)
    ax[1].set_xlabel('Value')

    # Add a title to the Figure
    fig.suptitle('Data Distribution')

    # Show the figure
    fig.show()

# Get the variable to examine
col = df_students['Grade']
# Call the function
show_distribution(col)
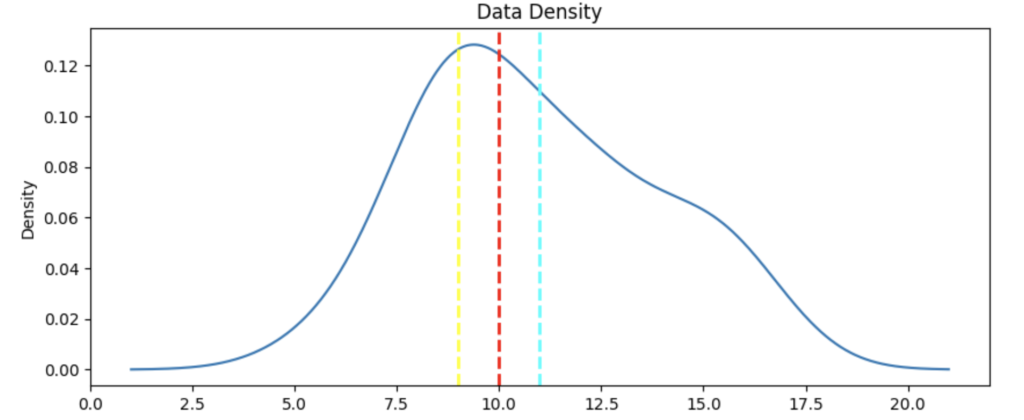
def show_density(var_data):
    fig = plt.figure(figsize=(10,4))

    # Plot density
    var_data.plot.density()

    # Add titles and labels
    plt.title('Data Density')

    # Show the mean, median, and mode
    plt.axvline(x=var_data.mean(), color = 'cyan', linestyle='dashed', linewidth = 2)
    plt.axvline(x=var_data.median(), color = 'red', linestyle='dashed', linewidth = 2)
    plt.axvline(x=var_data.mode()[0], color = 'yellow', linestyle='dashed', linewidth = 2)

    # Show the figure
    plt.show()

# Get the density of StudyHours
show_density(col)
Azure Databricks
Mount a remote Azure storage account as a DBFS folder, using the dbutils module:
data_storage_account_name = '<data_storage_account_name>'
data_storage_account_key = '<data_storage_account_key>'

data_mount_point = '/mnt/data'

data_file_path = '/bronze/wwi-factsale.csv'

dbutils.fs.mount(
  source = f"wasbs://dev@{data_storage_account_name}.blob.core.windows.net",
  mount_point = data_mount_point,
  extra_configs = {f"fs.azure.account.key.{data_storage_account_name}.blob.core.windows.net": data_storage_account_key})

display(dbutils.fs.ls("/mnt/data"))
#this path is available as dbfs:/mnt/data for spark APIs, e.g. spark.read
#this path is available as file:/dbfs/mnt/data for regular APIs, e.g. os.listdir

# %fs magic command - for accessing the dbutils filesystem module. Most dbutils.fs commands are available using %fs magic commands
We can override the cell’s default programming language by using one of the following magic commands at the start of the cell:
%python– for cells running python code%scala– for cells running scala code%r– for cells running R code%sql– for cells running sql code
Additional magic commands are available:
%md– for descriptive cells using markdown%sh– for cells running shell commands%run– for cells running code defined in a separate notebook%fs– for cells running code that usesdbutilscommands
Update RDP Source IP For Azure Virtual Machine
Remove-Variable * -ErrorAction SilentlyContinue; Remove-Module *; $error.Clear();
$config = @{
	SubscriptionName = "";
	VMName           = ""
}
$myip = (Invoke-WebRequest -uri "http://ifconfig.me/ip").Content
Write-Host "My Public IP is", $myip;

if (-Not(Get-InstalledModule -Name "Az")) {
	Write-Host "Installing Azure Package from PS Gallery...";
	Install-Module -Name Az -Scope CurrentUser -Repository PSGallery -Force;
}

if (-Not(Get-Module -Name "Az") -and -Not(Get-Command -Name Get-AZContext)) {
	Write-Host "Importing Azure Module..."
	Import-Module -Name Az -Force;
}

if (-Not (Get-AZContext)) {
	Write-Host "Connecting to Azure..."
	Connect-AzAccount #-Credential $azCredF
}

if ([bool]((Get-AZContext))) {	Write-Host "Connected to Azure using :", ((Get-AZContext).Account) }
else {	Write-Error "Failed to connect to Azure"; return; }

if (((Get-AZContext).Subscription.Name) -ne $config.SubscriptionName) {
	Write-Host "Switching Subscription Context...";
	(Get-AzSubscription -SubscriptionName $config.SubscriptionName) | 	Set-AzContext | Out-Null;
}
Write-Host "Subscription =", ((Get-AZContext).Subscription.Name);

$vm = Get-AzVM -VMName $config.VMName
Write-Host "Located Azure VM '$($vm.Name)' within '$($vm.ResourceGroupName)' ResourceGroup";

$nic = $vm.NetworkProfile.NetworkInterfaces;
$networkinterface = ($nic.id -split '/')[-1];
$nicdetails = Get-AzNetworkInterface -Name $networkinterface;

$nsg = Get-AzNetworkSecurityGroup -Name (($nicdetails.NetworkSecurityGroup.Id -split '/')[-1]) -ResourceGroupName ($vm.ResourceGroupName)

# $rules = Get-AzNetworkSecurityRuleConfig -NetworkSecurityGroup $networkSecurityGroup
# $rdpRule = $rules  | Where-Object { $_.Protocol -eq 'TCP' -and $_.DestinationPortRange -contains 3389 }

Write-Host "Before Updating public ip";
($nsg.SecurityRules | Where-Object { $_.Name -eq "RDP" }).SourceAddressPrefix

Write-Host ("*" * 10)
($nsg.SecurityRules | Where-Object { $_.Name -eq "RDP" }).SourceAddressPrefix = ([System.String[]] @("xxx.xxx.xxx.xxx", "xxx.xxx.xxx.xxx", $myip))
$nsg | Set-AzNetworkSecurityGroup | Get-AzNetworkSecurityRuleConfig -Name "RDP" | Out-Null

Write-Host "After Updating public ip";
($nsg.SecurityRules | Where-Object { $_.Name -eq "RDP" }).SourceAddressPrefix

Disconnect-AzAccount | Out-Null
OpenCV(cv2) Vs Pillow(PIL)
_ OpenCV is 1.4 Times faster than PIL _
Image is simply a matrix of pixels and each pixel is a single, square-shaped point of colored light. This can be explained quickly with a grayscaled image. grayscaled image is the image where each pixel represents different shades of a gray color.
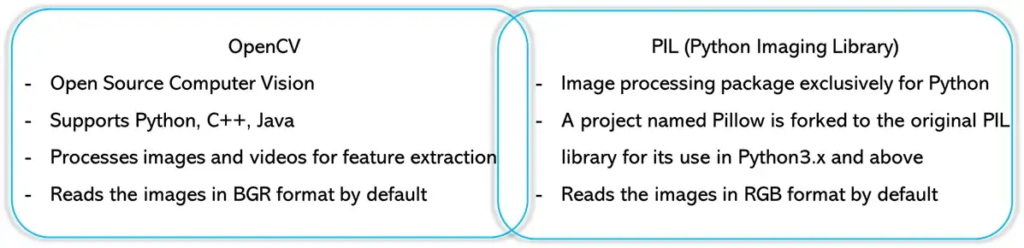
I mostly use OpenCV to complete my tasks as I find it 1.4 times quicker than PIL.
Let’s see, how the image can be processed using both — OpenCV and PIL.
## Installation & importing
# cv2
pip install opencv-python
import cv2

---

# PIL
pip install Pillow
from PIL import Image, ImageEnhance
## Read the image
# Read/open a colorful image
pil_img = Image.open("your_image.jpg")  # RGB
cv2_img = cv2.imread("your_image.jpg")  # BGR

# Read/open a grayscale image:
pil_img = Image.open("your_image.jpg").convert("L")
cv2_img = cv2.imread("your_image.jpg", cv2.IMREAD_GRAYSCALE)
## Write/save an image
pil_img.save("new_image.jpg")
cv2.imwrite("new_image.jpg", cv2_img)

# Write/save a JPEG image with specific quality:
pil_img.save("new_image.jpg", quality=95)
cv2.imwrite("new_image.jpg", cv2_img, [int(cv2.IMWRITE_JPEG_QUALITY), 95])
## Conversion between both
# Pillow image to OpenCV image:
cv2_img = np.array(pil_img)
cv2_img = cv2.cvtColor(cv2_img, cv2.COLOR_RGB2BGR)
# OpenCV image to Pillow image
cv2_img = cv2.cvtColor(cv2_img, cv2.COLOR_BGR2RGB)
pil_img = Image.fromarray(cv2_img)
Note: OpenCV images are in BGR color format, while Pillow images are in RGB color format. So we have to manually convert the color format from one to another.
## Shape / Size
# cv2
if cv2_img.ndim == 2:
  height, width = cv2_img.shape
  depth = 1
else:
  height, width, depth = cv2_img.shape

# PIL
width, height = pil_img.size
cv2_img = np.array(pil_img)
if cv2_img.ndim == 2:
  depth = 1
else:
  depth = cv2_img.shape[-1]
Note: It is hard to get the depth/channels directly from a Pillow image object, the easier way to do this would be to first convert it to an OpenCV image (ndarray) and then get the shape.
## Resize
# Resize without preserving the aspect ratio:
pil_img_resized = pil_img.resize((NEW_WIDTH, NEW_HEIGHT))
cv2_img_resized = cv2.resize(cv2_img, (NEW_WIDTH, NEW_HEIGHT))
Resize and preserve the aspect ratio:

# OpenCV:
scale_ratio = 0.6
width = int(img.shape[1] * scale_ratio)
height = int(img.shape[0] * scale_ratio)
dim = (width, height)
cv2_img_resized = cv2.resize(cv2_img, dim, interpolation=cv2.INTER_AREA)

# Pillow:
# scale ratio = min(max_width/width, max_height/height)
max_width = 256
max_height = 256
pil_img.thumbnail((max_width, max_height), Image.ANTIALIAS)
## RGBA to RGB
# Convert transparent pixels to white pixels (by pasting the RGBA image on a white RGB image).


#cv2
def cv2_RGBA2RGB(img):
  b, g, r, a = cv2.split(img)
  alpha = a / 255
  r = (255 * (1 - alpha) + r * alpha).astype(np.uint8)
  g = (255 * (1 - alpha) + g * alpha).astype(np.uint8)
  b = (255 * (1 - alpha) + b * alpha).astype(np.uint8)
  new_img = cv2.merge((b, g, r))
  return new_img

# PIL
def pil_RGBA2RGB(img):
  img.load() # for png.split()
  bg = Image.new("RGB", img.size, (255, 255, 255))
  bg.paste(img, mask=img.split()[3]) # 3 is the alpha channel
  return bg
## Read an image from a URL.
# without request headers

url = ''

# cv2
import cv2
import numpy as np
import requests
cv2_img = cv2.imdecode(np.asarray(requests.get(url, stream=True).content, dtype=np.uint8), cv2.IMREAD_UNCHANGED)

# PIL
importt io;
import requests
pil_img = Image.open(io.BytesIO(requests.get(url, stream=True).content))
## Base64 Conversions
# Read image file as base64:
import base64
with open("your_image.jpg", "rb") as f:
  base64_str = base64.b64encode(f.read())

# Conversion between Pillow & base64:
import base64
from io import BytesIO
from PIL import Image
def pil_to_base64(pil_img):
  img_buffer = BytesIO()
  pil_img.save(img_buffer, format='JPEG')
  byte_data = img_buffer.getvalue()
  base64_str = base64.b64encode(byte_data)
  return base64_str
def base64_to_pil(base64_str):
  pil_img = base64.b64decode(base64_str)
  pil_img = BytesIO(pil_img)
  pil_img = Image.open(pil_img)
  return pil_img

# Conversion between OpenCV & base64:
import base64
import numpy as np
import cv2
def cv2_base64(cv2_img):
  base64_str = cv2.imencode('.jpg', cv2_img)[1].tostring()
  base64_str = base64.b64encode(base64_str)
  return base64_str
def base64_cv2(base64_str):
  imgString = base64.b64decode(base64_str)
  nparr = np.fromstring(imgString, np.uint8)
  cv2_img= cv2.imdecode(nparr, cv2.IMREAD_COLOR)
  return cv2_img
- Pillow (PIL Fork) 9.4.0 documentation
- Image Processing — OpenCV Vs PIL – By Suraj Gurav
- The Ultimate Handbook for OpenCV & Pillow – By Steins
- https://note.nkmk.me/en/python-pillow-rotate/
- https://www.pyimagesearch.com/2021/02/03/opencv-image-translation/
- https://www.pyimagesearch.com/2017/01/02/rotate-images-correctly-with-opencv-and-python/
- https://stackoverflow.com/questions/14177744/how-does-perspective-transformation-work-in-pil
- https://www.pyimagesearch.com/2014/05/05/building-pokedex-python-opencv-perspective-warping-step-5-6/
- https://note.nkmk.me/python-opencv-warp-affine-perspective/
- https://stackoverflow.com/questions/25618756/how-to-convert-alpha-channel-of-the-image-to-white-color-using-opencv-python
- https://stackoverflow.com/questions/9166400/convert-rgba-png-to-rgb-with-pil