merge-main-into-remote-branch-guide
A safe, intelligent Git script that merges origin/main into remote feature branches using worktrees—so your current work is never disrupted.
🎯 Why Use This Script?
The Problem It Solves
When working on feature branches, you often need to merge the latest changes from main to:
- Keep your branch up-to-date
- Resolve conflicts early
- Ensure CI/CD pipelines pass with latest dependencies
Traditional approach problems:
git checkout feature-branch
git merge main
# ❌ Your working directory changes
# ❌ Uncommitted work gets in the way
# ❌ Conflicts force you to stop everything
# ❌ Multiple branches = lots of manual switching
How This Script Helps
✅ Non-Disruptive — Uses Git worktrees, never touches your current branch
✅ Safe — Detects conflicts and guides you through resolution
✅ Intelligent — Auto-selects when only one candidate branch exists
✅ Flexible — Supports dry-run mode, branch exclusions, batch operations
✅ Clean — Automatically removes worktrees and temporary branches when done
✅ User-Friendly — Clear prompts, helpful error messages, conflict resolution guides
📦 Installation
Option 1: ~/.local/bin (Recommended – XDG Standard)
The ~/.local/bin directory follows the XDG Base Directory specification and is the modern standard for user-local executables. Most Linux distributions automatically include it in PATH.
# 1. Create the directory (if it doesn't exist)
mkdir -p ~/.local/bin

# 2. Add to PATH if needed (most modern systems already include it)
# Check if it's already in your PATH:
echo $PATH | grep -q "$HOME/.local/bin" && echo "Already in PATH" || echo "Need to add to PATH"

# If you need to add it manually:
# For bash:
echo 'export PATH="$HOME/.local/bin:$PATH"' >> ~/.bashrc
source ~/.bashrc

# For zsh:
echo 'export PATH="$HOME/.local/bin:$PATH"' >> ~/.zshrc
source ~/.zshrc

# For fish:
fish_add_path ~/.local/bin

# 3. Install the script
curl -o ~/.local/bin/merge-main https://raw.githubusercontent.com/yourusername/yourrepo/main/merge-main-into-remote-branch.sh
chmod +x ~/.local/bin/merge-main

# Or if you already have the file locally:
cp merge-main-into-remote-branch.sh ~/.local/bin/merge-main
chmod +x ~/.local/bin/merge-main
Why ~/.local/bin?
- ✅ XDG Base Directory standard (widely adopted)
- ✅ Often already in PATH on modern Linux distributions
- ✅ Keeps user binaries separate from system binaries
- ✅ Respects the filesystem hierarchy standard
- ✅ Works seamlessly with systemd user services
Option 2: ~/bin (Alternative)
Traditional alternative, still widely used.
# Create a personal bin directory
mkdir -p ~/bin

# Add to PATH (usually required)
echo 'export PATH="$HOME/bin:$PATH"' >> ~/.bashrc
source ~/.bashrc

# Install the script
cp merge-main-into-remote-branch.sh ~/bin/merge-main
chmod +x ~/bin/merge-main
Option 3: System-Wide Installation
Requires sudo but makes it available to all users.
# Make executable and move to system bin
chmod +x merge-main-into-remote-branch.sh
sudo mv merge-main-into-remote-branch.sh /usr/local/bin/merge-main
Option 4: Shell Alias
Keep the script in your project and create an alias.
# Add to ~/.bashrc or ~/.zshrc
echo 'alias merge-main="/full/path/to/merge-main-into-remote-branch.sh"' >> ~/.bashrc
source ~/.bashrc
Verify Installation
# Check if the command is found
which merge-main

# Test with dry-run
DRY_RUN=1 merge-main
🚀 Usage
Basic Syntax
merge-main [module] [options]
Parameters:
module— (optional) Path to the Git repository folder- If omitted and current directory is a Git repo, uses it automatically
- Use
.to explicitly use the current directory - Otherwise, prompts for module name
Quick Examples
# Run in current directory (if it's a git repo)
merge-main

# Explicitly use current directory
merge-main .

# Specify a repository path
merge-main ~/projects/my-app
merge-main ./backend

# Preview without making changes
DRY_RUN=1 merge-main

# Exclude additional branches
EXCLUDE=develop,staging,release merge-main

# Combine options
DRY_RUN=1 EXCLUDE=hotfix,production merge-main ~/projects/api
🎛️ Environment Variables
DRY_RUN
Preview all Git commands without executing them.
# See what would happen without making changes
DRY_RUN=1 merge-main

# Output example:
# [dry-run] git fetch --prune origin
# [dry-run] git fetch origin main feature/user-auth
# [dry-run] git worktree add -b feature/user-auth ...
When to use:
- Testing the script for the first time
- Verifying which branch will be selected
- Checking excluded branches
- Understanding the workflow before committing
EXCLUDE
Comma-separated list of branch names to exclude from candidate selection.
# Default exclusions: develop, staging
# Also always excluded: main, HEAD

# Add more exclusions
EXCLUDE=develop,staging,hotfix,production merge-main

# Override defaults (only exclude release)
EXCLUDE=release merge-main

# No extra exclusions (only main and HEAD)
EXCLUDE= merge-main
Common use cases:
EXCLUDE=hotfix— Avoid merging into emergency fix branchesEXCLUDE=production,release— Skip protected deployment branchesEXCLUDE=archive/*— Skip archived branches
📖 Detailed Workflow
Step-by-Step Process
Repository Discovery
- Uses specified path or auto-detects current directory
- Validates it’s a Git repository
Fetch Latest State
- Runs
git fetch --prune originto sync remote branches - Ensures you’re working with up-to-date information
- Runs
Branch Selection
- Lists all remote branches except
main,HEAD, and excluded branches - Auto-selects if only one candidate exists
- Shows numbered menu if multiple candidates exist
- Lists all remote branches except
Worktree Setup
- Creates a temporary worktree in a safe location
- Checks out the target branch in the worktree
- Your current working directory remains untouched
Merge Execution
- Merges
origin/maininto the target branch - Creates a timestamped commit message
- Merges
Outcome Handling
- Success: Pushes to origin, cleans up worktree and temp branch
- Conflict: Shows conflicting files, provides resolution guide
🎯 Real-World Scenarios
Scenario 1: Single Feature Branch
You have one active feature branch that needs the latest main.
$ merge-main

==> No module specified — using current directory as repo
==> Fetching origin for '.'...
==> Fetching origin/main and origin/feature/user-auth...
==> Auto-selected branch: feature/user-auth
==> Creating worktree at '/tmp/_worktree-feature-user-auth' tracking origin/feature/user-auth
==> Merging origin/main into feature/user-auth...
==> Merge successful. Pushing feature/user-auth to origin...
==> Cleaning up worktree and local branch...

OK: merged main -> feature/user-auth in '.' at 10Apr2026 1430
Scenario 2: Multiple Branches
You have several feature branches and need to choose which one to update.
$ merge-main ~/projects/api

Multiple candidate branches found:
  [1] feature/authentication
  [2] feature/payment-gateway
  [3] bugfix/timeout-issue
Pick one [1-3]: 2

==> Fetching origin/main and origin/feature/payment-gateway...
==> Creating worktree...
==> Merging origin/main into feature/payment-gateway...
==> Merge successful. Pushing feature/payment-gateway to origin...

OK: merged main -> feature/payment-gateway in 'api' at 10Apr2026 1445
Scenario 3: Merge Conflict
The merge encounters conflicts that need manual resolution.
$ merge-main

==> Merging origin/main into feature/new-ui...

!! Merge conflict detected. Conflicting files:
     - src/components/Header.jsx
     - src/styles/theme.css

   Resolve conflicts manually, then push:

   Step 1 — Go to the worktree where the conflict lives:
            cd /tmp/_worktree-feature-new-ui

   Step 2 — See the full status:
            git status

   Step 3 — Open each conflicting file and resolve the markers:

            <<<<<<< HEAD          ← your branch (feature/new-ui)
            your code
            =======
            incoming code
            >>>>>>> origin/main   ← what came from main

   Step 4 — Mark each resolved file as done:
            git add <file>

   Step 5 — Complete the merge commit:
            git commit

   Step 6 — Push the resolved branch:
            git push -u origin feature/new-ui

   Step 7 — Clean up the worktree:
            cd -
            git worktree remove /tmp/_worktree-feature-new-ui
            git branch -D feature/new-ui
Resolution Example:
# Navigate to worktree
cd /tmp/_worktree-feature-new-ui

# Edit conflicting files in your editor
vim src/components/Header.jsx

# After resolving conflicts
git add src/components/Header.jsx src/styles/theme.css
git commit
git push -u origin feature/new-ui

# Return to original directory and clean up
cd -
git worktree remove /tmp/_worktree-feature-new-ui
git branch -D feature/new-ui
Scenario 4: Batch Processing
Update all feature branches across multiple repositories.
# Process all git repos in subdirectories
for dir in */; do
    if [[ -d "$dir/.git" ]]; then
        echo "Processing $dir..."
        merge-main "${dir%/}"
    fi
done
Example Output:
Processing api/...
OK: merged main -> feature/v2-endpoints in 'api' at 10Apr2026 1500

Processing frontend/...
OK: merged main -> feature/dashboard in 'frontend' at 10Apr2026 1502

Processing workers/...
!! Merge conflict detected in 'workers'...
Scenario 5: Dry Run Before Production
Test what will happen before making actual changes.
# Preview the entire workflow
DRY_RUN=1 merge-main

[dry-run] git fetch --prune origin
[dry-run] git fetch origin main feature/critical-fix
[dry-run] git worktree add -b feature/critical-fix /tmp/_worktree-feature-critical-fix origin/feature/critical-fix
[dry-run] git merge origin/main -m "merge: main into feature/critical-fix 10Apr2026 1515"
[dry-run] git push -u origin feature/critical-fix
[dry-run] git worktree remove /tmp/_worktree-feature-critical-fix

# If it looks good, run for real
merge-main
🛡️ Safety Features
1. Worktree Isolation
Your current branch and working directory are never modified. All merge operations happen in a temporary worktree.
Your Repo                    Temporary Worktree
---------                    ------------------
main ← you're here          feature/xyz ← merge happens here
feature/xyz (remote)
2. Stale Worktree Detection
If a previous run was interrupted (conflict, crash, manual abort), the script detects leftover worktrees and handles them intelligently.
With unresolved conflicts:
!! A worktree already exists at: /tmp/_worktree-feature-xyz
   WARNING: These files still have unresolved merge conflicts:
     - src/app.js
     - config/settings.py

   Force-removing this worktree will PERMANENTLY DISCARD those changes.

   Force remove and start fresh? [y/N]
With uncommitted changes:
!! A worktree already exists at: /tmp/_worktree-feature-xyz
   WARNING: The worktree has uncommitted changes:
     M  src/utils.js
     A  tests/new-test.js

   Force-removing this worktree will PERMANENTLY DISCARD those changes.

   Force remove and start fresh? [y/N]
Clean worktree (no changes):
==> Stale worktree has no pending changes — removing automatically
3. Branch Validation
Automatically excludes:
origin/HEAD(symbolic reference)origin/main(the source branch)- Branches in
EXCLUDElist (default:develop,staging)
4. Graceful Conflict Handling
Instead of leaving you in a broken state, the script:
- Clearly lists which files have conflicts
- Provides step-by-step resolution instructions
- Preserves the worktree so you can fix conflicts manually
- Exits with status code 1 (won’t silently fail in scripts)
🔧 Advanced Usage
Custom Commit Message Pattern
Edit the script to customize the commit message:
# Find this line in the script (around line 163):
MSG="merge: main into ${BRANCH} ${STAMP}"

# Change to your preferred format:
MSG="chore: sync ${BRANCH} with main (${STAMP})"
MSG="Merge main → ${BRANCH} | ${STAMP}"
MSG="🔀 main → ${BRANCH}"
Integration with CI/CD
Use in automation pipelines:
#!/bin/bash
# .github/workflows/sync-branches.sh

set -e

# Fail fast if merge has conflicts
merge-main || {
    echo "Merge conflict detected - manual intervention required"
    exit 1
}

# Continue with tests, deployments, etc.
Custom Exclusion Lists per Project
Create a wrapper script:
#!/bin/bash
# sync-api-branches.sh

# Project-specific exclusions
export EXCLUDE="hotfix,production,release,v1-stable"

merge-main ~/projects/api
Monitoring in Scripts
Capture output for logging:
LOG_FILE="merge-$(date +%Y%m%d).log"

merge-main 2>&1 | tee -a "$LOG_FILE"

if [[ ${PIPESTATUS[0]} -eq 0 ]]; then
    echo "✓ Merge completed successfully" >> "$LOG_FILE"
else
    echo "✗ Merge failed - check log" >> "$LOG_FILE"
    # Send alert, create ticket, etc.
fi
❓ FAQ
Q: What if I accidentally run this on main itself?
The script explicitly excludes main from the candidate list, so it won’t let you merge main into main.
Q: Can I use this with GitHub/GitLab protected branches?
Yes, but you need push permissions. If the target branch is protected, the push step will fail with a permission error. The merge itself happens locally in the worktree.
Q: What happens to my uncommitted changes?
Nothing—they remain untouched. The script works in a separate worktree, not your current directory.
Q: Can I merge into multiple branches at once?
Not directly, but you can script it:
for branch in feature/auth feature/payments feature/notifications; do
    echo "Processing $branch..."
    # Script will auto-select if you filter candidates to match exactly one
    EXCLUDE="$(git branch -r | sed 's|origin/||' | grep -v "$branch" | tr '\n' ',')" merge-main
done
Q: How do I abort a merge in progress?
# Navigate to the worktree
cd /tmp/_worktree-your-branch

# Abort the merge
git merge --abort

# Return and clean up
cd -
git worktree remove /tmp/_worktree-your-branch
git branch -D your-branch
Q: Does this work with submodules?
Yes, but each submodule is a separate Git repository. You’d need to run the script separately for each submodule, or create a wrapper that iterates through them.
🐛 Troubleshooting
“command not found: merge-main”
Problem: Script is not in PATH or not executable.
Solution:
# Check if it exists
ls -la ~/.local/bin/merge-main

# Make sure it's executable
chmod +x ~/.local/bin/merge-main

# Verify PATH includes ~/.local/bin
echo $PATH | grep "$HOME/.local/bin"

# If not in PATH, add it:
echo 'export PATH="$HOME/.local/bin:$PATH"' >> ~/.bashrc

# Reload shell config
source ~/.bashrc  # or ~/.zshrc
“not a git repository”
Problem: Running in a directory that isn’t a Git repo.
Solution:
# Check if current dir is a git repo
git status

# Or specify the repo path explicitly
merge-main /path/to/your/repo
“no non-main remote branch found”
Problem: All branches are excluded or only main exists.
Solution:
# Check what branches exist
git branch -r

# Adjust exclusions
EXCLUDE= merge-main  # Remove default exclusions

# Or create a feature branch first
git checkout -b feature/new-feature
git push -u origin feature/new-feature
Worktree conflicts with existing directory
Problem: /tmp/_worktree-branch-name already exists.
Solution:
# The script should handle this automatically
# If it doesn't, manually remove:
git worktree remove --force /tmp/_worktree-branch-name

# Then re-run the script
merge-main
📝 Script Reference
Full Script
#!/usr/bin/env bash
# =============================================================================
# merge-main-into-remote-branch.sh
#
# PURPOSE:
#   Merges origin/main into a non-main remote branch inside a git repo (module).
#   Uses git worktree so your current working branch is never touched.
#
# USAGE:
#   ./merge-main-into-remote-branch.sh [module]
#
#   module  — (optional) path to the git repo folder.
#             If omitted, the script checks if the current directory is a git
#             repo and uses it automatically, otherwise it prompts.
#             Pass "." to explicitly use the current directory.
#
# OPTIONS (environment variables):
#   DRY_RUN=1          — Preview all git commands without executing them.
#   EXCLUDE=a,b,c      — Comma-separated branch names to exclude from candidates
#                        in addition to main and HEAD (default: "develop,staging").
#
# EXAMPLES:
#   ./merge-main-into-remote-branch.sh managebac
#   ./merge-main-into-remote-branch.sh .
#   DRY_RUN=1 ./merge-main-into-remote-branch.sh managebac
#   EXCLUDE=develop,staging,release ./merge-main-into-remote-branch.sh managebac
#
#   # Run across ALL subdirectories that are git repos:
#   for dir in */; do
#       [[ -d "$dir/.git" ]] && ./merge-main-into-remote-branch.sh "${dir%/}"
#   done
# =============================================================================

# NOTE: We intentionally do NOT use `set -e` globally here.
# The merge step is expected to exit non-zero on conflicts, and we need to
# handle that gracefully ourselves rather than letting bash abort the script.
# We keep -u (undefined variable check) and -o pipefail for safety.
set -uo pipefail

# -----------------------------------------------------------------------------
# CONFIG
# -----------------------------------------------------------------------------

# Dry-run mode: set DRY_RUN=1 to preview without making any changes
DRY_RUN="${DRY_RUN:-0}"

# Branches to always exclude from candidate list (on top of main and HEAD)
EXCLUDE="${EXCLUDE:-develop,staging}"

# -----------------------------------------------------------------------------
# HELPERS
# -----------------------------------------------------------------------------

# Print a timestamped info message
info() { echo "==> $*"; }

# Print an error to stderr and exit immediately
die()  { echo "error: $*" >&2; exit 1; }

# Run a command normally, or just print it when DRY_RUN=1
run() {
    if [[ "$DRY_RUN" == "1" ]]; then
        echo "[dry-run] $*"
    else
        "$@"
    fi
}

# Ask a yes/no question — returns 0 for yes, 1 for no
# Usage: confirm "Are you sure?" && do_something
confirm() {
    local prompt="${1:-Are you sure?}"
    local reply
    read -rp "$prompt [y/N] " reply
    [[ "${reply,,}" == "y" || "${reply,,}" == "yes" ]]
}

# -----------------------------------------------------------------------------
# RESOLVE MODULE / REPO PATH
# -----------------------------------------------------------------------------

MODULE="${1:-}"

# If no argument given, check if the current directory is already a git repo
if [[ -z "$MODULE" ]]; then
    if git rev-parse --git-dir > /dev/null 2>&1; then
        info "No module specified — using current directory as repo"
        MODULE="."
    else
        read -rp "Module name (e.g. managebac) or '.' for current dir: " MODULE
    fi
fi

[[ -z "$MODULE" ]] && die "module name required"
[[ -d "$MODULE" ]]  || die "'$MODULE' is not a directory"

# Move into the module directory
cd "$MODULE"

# Confirm this is actually a git repository
git rev-parse --git-dir > /dev/null 2>&1 || die "'$MODULE' is not a git repository"

# -----------------------------------------------------------------------------
# FETCH LATEST REMOTE STATE
# -----------------------------------------------------------------------------

info "Fetching origin for '$MODULE'..."
run git fetch --prune origin

# -----------------------------------------------------------------------------
# BUILD EXCLUDE PATTERN
# -----------------------------------------------------------------------------

# Convert comma-separated EXCLUDE into a regex alternation e.g. "develop|staging"
EXCLUDE_PATTERN=$(echo "$EXCLUDE" | tr ',' '|')

# -----------------------------------------------------------------------------
# DISCOVER CANDIDATE BRANCHES
# -----------------------------------------------------------------------------

# List all remote branches, strip whitespace, filter out:
#   - origin/HEAD  — just a symbolic pointer, not a real branch
#   - origin/main  — this is the source, never the target
#   - EXCLUDE list — e.g. develop, staging
mapfile -t CANDIDATES < <(
    git branch -r \
        | sed 's/^[[:space:]]*//' \
        | grep -v '^origin/HEAD' \
        | grep -v '^origin/main$' \
        | grep -vE "^origin/(${EXCLUDE_PATTERN})$" \
        | sed 's|^origin/||'
)

# -----------------------------------------------------------------------------
# SELECT TARGET BRANCH
# -----------------------------------------------------------------------------

if [[ ${#CANDIDATES[@]} -eq 0 ]]; then
    die "no non-main remote branch found in '$MODULE' (excluded: main, $EXCLUDE)"

elif [[ ${#CANDIDATES[@]} -eq 1 ]]; then
    # Only one candidate — select it automatically, no prompt needed
    BRANCH="${CANDIDATES[0]}"
    info "Auto-selected branch: $BRANCH"

else
    # Multiple candidates — present a numbered menu and let the user choose
    echo "Multiple candidate branches found:"
    for i in "${!CANDIDATES[@]}"; do
        printf "  [%d] %s\n" "$((i+1))" "${CANDIDATES[$i]}"
    done
    read -rp "Pick one [1-${#CANDIDATES[@]}]: " PICK

    [[ "$PICK" =~ ^[0-9]+$ ]]                        || die "invalid pick: '$PICK'"
    (( PICK >= 1 && PICK <= ${#CANDIDATES[@]} ))      || die "out of range: $PICK"

    BRANCH="${CANDIDATES[$((PICK-1))]}"
fi

# -----------------------------------------------------------------------------
# PREPARE WORKTREE PATH & COMMIT MESSAGE
# -----------------------------------------------------------------------------

# Sanitize branch name: lowercase, replace slashes and spaces with dashes
SAFE_BRANCH="$(echo "$BRANCH" | tr '[:upper:]/ ' '[:lower:]-')"

if [[ "$MODULE" == "." ]]; then
    # Running inside the repo itself — place worktree in /tmp to avoid nesting
    WORKTREE="/tmp/_worktree-${SAFE_BRANCH}"
else
    # Place worktree as a sibling of the module directory
    WORKTREE="../_${MODULE}-${SAFE_BRANCH}"
fi

STAMP="$(date +'%d%b%Y %H%M')"
MSG="merge: main into ${BRANCH} ${STAMP}"

# -----------------------------------------------------------------------------
# FETCH MAIN + TARGET BRANCH (ensure both are up to date)
# -----------------------------------------------------------------------------

info "Fetching origin/main and origin/$BRANCH..."
run git fetch origin main "$BRANCH"

# -----------------------------------------------------------------------------
# HANDLE STALE WORKTREE FROM A PREVIOUS FAILED RUN
# -----------------------------------------------------------------------------

# `git worktree list` prints absolute paths — use grep -F (fixed string, no regex)
# to safely match the exact path without worrying about special characters
if git worktree list | grep -qF "$WORKTREE"; then

    echo ""
    echo "!! A worktree already exists at: $WORKTREE"
    echo "   This is likely left over from a previous run that had conflicts."
    echo ""

    # Check for files that are still in an unresolved conflict state (diff-filter=U)
    UNMERGED=$(git -C "$WORKTREE" diff --name-only --diff-filter=U 2>/dev/null || true)

    # Check for any other uncommitted changes (staged, unstaged, untracked)
    UNCOMMITTED=$(git -C "$WORKTREE" status --porcelain 2>/dev/null || true)

    if [[ -n "$UNMERGED" ]]; then
        # Unresolved conflict markers still present — highest risk, warn loudly
        echo "   WARNING: These files still have unresolved merge conflicts:"
        echo "$UNMERGED" | sed 's/^/     - /'
        echo ""
        echo "   Force-removing this worktree will PERMANENTLY DISCARD those changes."
        echo ""
        confirm "   Force remove and start fresh?" \
            || die "aborted — resolve conflicts manually in $WORKTREE then re-run"

    elif [[ -n "$UNCOMMITTED" ]]; then
        # Changes exist but no conflict markers — could be partial manual fixes
        echo "   WARNING: The worktree has uncommitted changes:"
        echo "$UNCOMMITTED" | sed 's/^/     /'
        echo ""
        echo "   Force-removing this worktree will PERMANENTLY DISCARD those changes."
        echo ""
        confirm "   Force remove and start fresh?" \
            || die "aborted — inspect $WORKTREE before proceeding"

    else
        # Worktree is clean — safe to remove silently without asking
        info "Stale worktree has no pending changes — removing automatically"
    fi

    run git worktree remove --force "$WORKTREE"
fi

# Remove any local tracking branch left over from a prior run.
# Try safe delete (-d) first; only force-delete (-D) if git considers it unmerged.
if git branch --list "$BRANCH" | grep -q .; then
    git branch -d "$BRANCH" 2>/dev/null \
        || git branch -D "$BRANCH" 2>/dev/null \
        || true
fi

# -----------------------------------------------------------------------------
# CREATE FRESH WORKTREE TRACKING THE TARGET BRANCH
# -----------------------------------------------------------------------------

info "Creating worktree at '$WORKTREE' tracking origin/$BRANCH"
run git worktree add -b "$BRANCH" "$WORKTREE" "origin/$BRANCH"

# -----------------------------------------------------------------------------
# MERGE origin/main INTO TARGET BRANCH
# -----------------------------------------------------------------------------

info "Merging origin/main into $BRANCH..."

# Temporarily disable pipefail around the merge command.
# git merge exits non-zero on conflicts — that is expected and handled below.
# Without this, pipefail would cause the script to abort before we can react.
pushd "$WORKTREE" > /dev/null

set +e
run git merge origin/main -m "$MSG"
MERGE_EXIT=$?
set -e

popd > /dev/null

# -----------------------------------------------------------------------------
# OUTCOME: SUCCESS — push and clean up
# -----------------------------------------------------------------------------

if [[ $MERGE_EXIT -eq 0 ]]; then

    info "Merge successful. Pushing $BRANCH to origin..."
    pushd "$WORKTREE" > /dev/null
    run git push -u origin "$BRANCH"
    popd > /dev/null

    info "Cleaning up worktree and local branch..."
    run git worktree remove "$WORKTREE"
    git branch -d "$BRANCH" 2>/dev/null \
        || git branch -D "$BRANCH" 2>/dev/null \
        || true

    echo ""
    echo "OK: merged main -> $BRANCH in '$MODULE' at $STAMP"

# -----------------------------------------------------------------------------
# OUTCOME: CONFLICT — show exactly what conflicts exist and guide resolution
# -----------------------------------------------------------------------------

else

    # List the conflicting files immediately so the user knows where to look
    echo ""
    echo "!! Merge conflict detected. Conflicting files:"
    git -C "$WORKTREE" diff --name-only --diff-filter=U \
        | sed 's/^/     - /'

    cat <<EOF

   Resolve conflicts manually, then push:

   Step 1 — Go to the worktree where the conflict lives:
            cd $WORKTREE

   Step 2 — See the full status:
            git status

   Step 3 — Open each conflicting file and resolve the markers:

            <<<<<<< HEAD          ← your branch ($BRANCH)
            your code
            =======
            incoming code
            >>>>>>> origin/main   ← what came from main

   Step 4 — Mark each resolved file as done:
            git add <file>

   Step 5 — Complete the merge commit:
            git commit

   Step 6 — Push the resolved branch:
            git push -u origin $BRANCH

   Step 7 — Clean up the worktree (run from the repo root, not inside the worktree):
            cd -
            git worktree remove $WORKTREE
            git branch -D $BRANCH

   TIP: To abandon the merge entirely and start over:
            git merge --abort     ← run this inside $WORKTREE first
            then re-run this script from the repo root.

EOF
    exit 1
fi
🤝 Contributing
Found a bug? Have a feature request? Contributions are welcome!
- Fork the repository
- Create a feature branch (
git checkout -b feature/amazing-feature) - Commit your changes (
git commit -m 'Add amazing feature') - Push to the branch (
git push origin feature/amazing-feature) - Open a Pull Request
📄 License
This script is provided as-is under the MIT License. Feel free to use, modify, and distribute.
🙏 Acknowledgments
Built with love for developers who are tired of:
- Switching branches constantly
- Merge conflicts destroying their flow
- Forgetting which branches need updates
- Manual, error-prone sync processes
Happy merging! 🚀
PowerSchool API Postman Collection
 PowerSchool API Postman Collection, feel free to copy to fork it
Overview
This collection provides a complete, production-ready setup for working with PowerSchool APIs. It implements automatic OAuth authentication with token validation, eliminating manual token management and enabling seamless multi-environment workflows.
Key Features
🔐 Automatic Authentication
- Zero Manual Token Management: Tokens are obtained and validated automatically before every request
- Smart Token Validation: Validates tokens against the PowerSchool metadata endpoint (
/ws/v1/metadata) - Auto-Refresh on Expiry: Automatically refreshes expired or invalid tokens
- Bearer Token Headers: All requests automatically include properly formatted
Authorization: Bearer {{psAuthToken}}headers
🌍 Multi-Environment Support
- Different PowerSchool Instances: Easily switch between multiple PowerSchool servers (Development, Staging, Production)
- Credential Isolation: Each environment has its own
psURL,psClientID, andpsClientSecret - Shared Token Storage:
psAuthTokenstored at collection level, shared across all environments - One-Click Switching: Select different environments from Postman dropdown
✅ Token Validation
- Metadata Endpoint Check: Validates token by calling
/ws/v1/metadata - Plugin ID Detection: Confirms token validity by checking for
plugin_idin response - Automatic Recovery: If token is invalid, automatically obtains a new one
- Error Prevention: Detects authentication issues before they cause request failures
📋 Complete Request Examples
- PowerSchool OAuth Request: Direct OAuth endpoint for manual token retrieval
- Get Metadata (with token): Example of authenticated request
- Get Metadata (without token): Shows public metadata access
- Get Students By District: Production-ready example with auto-auth
How It Works
Request Flow
When you click Send on any request:
1. Collection Pre-request Script Runs
   ↓
2. Check: Does psAuthToken exist?
   ├─ NO  → Obtain new token via OAuth
   ├─ YES → Validate token via /ws/v1/metadata
   │        ├─ Valid (has plugin_id) → Proceed
   │        └─ Invalid (no plugin_id) → Get new token
   ↓
3. Token stored in psAuthToken (collection variable)
   ↓
4. Request executes with Authorization: Bearer {{psAuthToken}}
   ↓
5. Response received
Token Validation Logic
Valid Token Response:
{
    "metadata": {
        "plugin_id": 15334,
        "powerschool_version": "25.7.0.1.252121950",
        ...
    }
}
Invalid Token Response:
{
    "metadata": {
        "district_timezone": "Asia/Riyadh",
        ...
        (NO plugin_id field)
    }
}
The script detects missing plugin_id and automatically refreshes the token.
Setup Instructions
1. Create Environments
For each PowerSchool instance, create an environment with:
| Variable | Value |
|---|---|
psURL | https://your-powerschool-domain.com |
psClientID | Your OAuth client ID |
psClientSecret | Your OAuth client secret |
2. Collection Variables
The collection already includes:
psAuthToken– Auto-populated by OAuth script (do not edit)
3. Select Environment
Before making requests, select your environment from the Postman dropdown (top-right).
4. Make Requests
Click Send on any request. The collection pre-request script handles all authentication automatically.
Collection Structure
PowerSchool API Postman Collection
├── Authentication (Collection-level Pre-request Script)
│   ├── Token validation against /ws/v1/metadata
│   ├── Auto-refresh on expiry
│   └── Error handling
│
├── PowerSchool OAuth Request (POST)
│   └── Direct OAuth endpoint access
│   └── Manual token retrieval (for testing)
│
├── Get Metadata (with token) (GET)
│   └── Authenticated metadata endpoint
│   └── Shows valid token usage
│
├── Get Metadata (without token) (GET)
│   └── Public metadata access
│   └── Shows response without authentication
│
└── Get Students By District (GET)
    └── Example authenticated API request
    └── Returns district student data
Variables Reference
Collection Variables
psAuthToken– OAuth access token (auto-populated, do NOT manually edit)
Environment Variables (Set per PowerSchool instance)
psURL– PowerSchool domain (e.g.,https://ps.asb.bh)psClientID– OAuth client ID from PowerSchool adminpsClientSecret– OAuth client secret from PowerSchool admin
Console Logging
The collection provides detailed console logging for debugging:
Successful Token Validation:
⚠ Validating existing token...
✓ Token is valid. Plugin ID: 15334
✓ Auth token already set, proceeding...
Token Refresh:
⚠ Validating existing token...
⚠ Token is invalid. No plugin_id in metadata response
⚠ Token is invalid, getting new one...
⚠ Getting new authentication token...
✓ New token obtained successfully
Missing Credentials:
✗ Missing required variables: psURL, psClientID, or psClientSecret
Open Postman Console (bottom-left) to view all logs.
Common Use Cases
Adding New PowerSchool API Endpoints
- Click “+” to add new request to collection
- Set method and URL:
{{psURL}}/ws/v1/[endpoint] - Add headers:
Authorization: Bearer {{psAuthToken}}Accept: application/json
- Click Save
The collection pre-request script automatically handles authentication for all new requests.
Switching Between PowerSchool Instances
- Open Postman
- Click environment dropdown (top-right)
- Select desired environment
- Make request – collection script uses selected environment’s credentials
Manual OAuth Testing
- Click PowerSchool OAuth Request
- Verify environment is selected
- Click Send
- Token is extracted and stored in
psAuthToken - Check console for success/error messages
Validating Token Status
- Click Get Metadata (with token)
- Click Send
- Response shows current metadata with or without
plugin_id - If
plugin_idis present, token is valid - If
plugin_idis missing, token will auto-refresh on next request
Error Handling
“Missing required variables”
Cause: Environment variables not set
Solution: Add psURL, psClientID, psClientSecret to selected environment
“OAuth request failed with status 401”
Cause: Incorrect credentials Solution: Verify OAuth client ID and secret in PowerSchool admin portal
“Token is invalid. No plugin_id in metadata response”
Cause: Token lacks required permissions or is expired Solution: Token auto-refreshes automatically on next request
“Authorization header empty”
Cause: Token didn’t load before request executed Solution: Wait a moment and retry, or manually run OAuth request first
Best Practices
Security
- ✓ Never commit real credentials to version control
- ✓ Use Postman environments to store sensitive data
- ✓ Treat
psClientSecretlike a password - ✓ Rotate OAuth credentials periodically
Organization
- ✓ Use meaningful request names
- ✓ Group related endpoints in folders
- ✓ Document expected responses in request descriptions
- ✓ Keep collection pre-request script clean and updated
Maintenance
- ✓ Test collection monthly with all environments
- ✓ Monitor PowerSchool API changes
- ✓ Update endpoints as PowerSchool APIs evolve
- ✓ Keep OAuth credentials current
API Endpoints Included
| Endpoint | Method | Purpose |
|---|---|---|
/oauth/access_token | POST | OAuth token retrieval |
/ws/v1/metadata | GET | System metadata (with & without token) |
/ws/v1/district | GET | District information |
Next Steps
- Create Environments: Add your PowerSchool instances as separate environments
- Set Credentials: Configure
psURL,psClientID,psClientSecretper environment - Test Collection: Run requests and verify token validation in console
- Extend Collection: Add more endpoints as needed using the same patterns
Support & Troubleshooting
Check Console Logs
Open Postman Console (bottom of screen) to see detailed execution logs including:
- Token validation results
- OAuth request status
- Variable resolution
- Error messages
Validate Token Manually
- Run Get Metadata (with token)
- Look for
"plugin_id"in response - If present: Token is valid ✓
- If missing: Token needs refresh (auto-handled)
Test OAuth Endpoint
- Run PowerSchool OAuth Request
- Check console for:
✓ Set psAuthToken as [token]– Success✗ OAuth failed...– Check credentials
FAQ
Q: Do I need to manually get a token? A: No. The collection automatically manages tokens. Manual OAuth request is only for testing.
Q: Can I use this with multiple PowerSchool instances? A: Yes. Create separate environments for each instance and switch between them.
Q: What happens if my token expires? A: The collection automatically detects expiry and refreshes the token before the next request.
Q: Where is my token stored?
A: In the collection variable psAuthToken. It persists across environment switches.
Q: Can I see what the script is doing? A: Yes. Open Postman Console (Ctrl+Alt+C or Cmd+Option+C) to view detailed logs.
Q: How often do tokens refresh? A: Only when they expire or are invalid. Valid tokens are reused across requests.
Author: Prince PARK
Version: 1.0
Last Updated: March 26, 2026
Created For: PowerSchool API Integration
Requires: Postman 10.0+
Claude Code commands `sync-claude-md`
Setup a global Claude Code slash command that diffs your unstaged changes and untracked files and auto-updates `CLAUDE.md`.
How global slash commands work
Claude Code looks for custom commands in ~/.claude/commands/. Each .md file becomes a /command-name you can invoke from any project.
Step 1 — Create the global commands directory
mkdir -p ~/.claude/commands
Step 2 — Create the command file
cat > ~/.claude/commands/sync-claude-md.md << 'EOF'
# Sync CLAUDE.md from unstaged changes

You are a senior engineer maintaining a living CLAUDE.md for this project.
Your job is to analyze what has changed in the working tree and surgically update CLAUDE.md to reflect those changes — without rewriting sections that are still accurate.

## Phase 1 — Capture the diff

Run the following commands and carefully read every line of output:

```bash
git diff
```

```bash
git diff --stat
```

```bash
git status --short
```

Also read any new untracked files that are relevant to project structure:

```bash
git ls-files --others --exclude-standard
```

## Phase 2 — Read current CLAUDE.md

Read the existing CLAUDE.md in full so you know what is already documented and what needs updating.

## Phase 3 — Analyze the diff

For every changed file, determine:

- Was a new dependency added or removed? (\*.csproj changes)
- Was the architecture changed? (new folder, new project, new layer)
- Were commands changed? (Program.cs, launchSettings.json, Makefile, tasks.json)
- Were new environment variables or config keys introduced? (appsettings\*.json)
- Was the database schema or migration strategy changed? (DbContext, Migrations/)
- Were new API routes or controllers added? (Controllers/)
- Were code conventions changed? (.editorconfig, .globalconfig, Directory.Build.props)
- Were tests added that reveal new patterns? (_Tests_/)
- Was anything removed that CLAUDE.md still documents?

## Phase 4 — Update CLAUDE.md surgically

Rules:

- ONLY edit sections that are directly affected by the diff
- Do NOT rewrite or reformat sections that are still accurate
- If a new section is needed, add it — do not skip it
- If a section is now outdated, update it with the accurate information
- If something was deleted from the codebase, remove it from CLAUDE.md
- Preserve the existing structure and tone
- Every command you write must be one you verified actually exists in this repo

After saving CLAUDE.md, print a concise changelog of exactly what you changed and why, in this format:

**CLAUDE.md Update Summary**

- [Section name]: [what changed and why]
- [Section name]: [what changed and why]
EOF
Step 3 — Verify it’s available
ls ~/.claude/commands/
# should show: sync-claude-md.md
Step 4 — Use it from any project
Open Claude Code in your project terminal and run:
/sync-claude-md
Claude will immediately run the three git commands, read the diff, compare against your current CLAUDE.md, and surgically update only the affected sections.
Optional — Add a faster alias for the diff-only audit
If you also want a lightweight read-only version that reports what’s stale without editing, add a second command:
cat > ~/.claude/commands/audit-claude-md.md << 'EOF'
# Audit CLAUDE.md against unstaged changes

Run these commands and read the output fully:

```bash
git diff
git diff --stat
git status --short
git ls-files --others --exclude-standard
```

Then read the current CLAUDE.md in full.

Compare the diff against CLAUDE.md and produce a gap report in this format:

**CLAUDE.md Gap Report**

| Section       | Status      | Issue                                                            |
| ------------- | ----------- | ---------------------------------------------------------------- |
| Tech Stack    | ⚠️ Stale    | Package X was removed in csproj but still listed                  |
| Commands      | ✅ Accurate | No changes                                                        |
| Configuration | ⚠️ Missing  | New key `Feature:FlagName` added in appsettings.Development.json  |

After the table, list your recommended edits in priority order.
Do NOT modify any files — this is a read-only audit.
EOF
Then use it as:
/audit-claude-md
Final directory structure
~/.claude/
└── commands/
├── sync-claude-md.md ← edits CLAUDE.md automatically
└── audit-claude-md.md ← read-only gap report
Both commands are global and will work in any project that has a CLAUDE.md and a git repo — including your ASP.NET Core project and any future ones.
Git Submodules Setup Guide
Git Submodules Setup Guide
Setting up a clean main repo with submodules using temporary bare repositories stored inside
.git/— no sibling folder pollution, zero cleanup drama when real remote URLs arrive.
Target Structure
.
├── .git/
│   ├── local-submodules/         ← temporary bare repos (hidden, never tracked)
│   │   ├── Middlewares.git
│   │   ├── PowerAut0mater.git
│   │   └── Shared.git
├── .gitmodules
├── Middlewares/                  ← submodule
├── PowerAut0mater/               ← submodule
└── Shared/                       ← submodule
Why
.git/local-submodules/? The.git/folder is never tracked by Git. This means the bare repos live completely hidden from your working tree, no sibling folders are created, and when you switch to real remote URLs later there is nothing to clean up except one optionalrm -rf.
Step 1 — Initialize the Main Repository
# Navigate into your project root
cd /projects

# Initialize a new Git repository and name the default branch "main"
# -b main → sets the initial branch name (instead of the old default "master")
git init -b main
Step 2 — Create Bare Repos Inside .git/
# Create the hidden folder that will hold all temporary bare repos
# -p → creates parent directories as needed; no error if folder already exists
mkdir -p .git/local-submodules

# Initialize a bare Git repository for each submodule
# --bare → creates a repo with NO working tree (just raw git data)
#          correct format for a repo that will only be pushed to / cloned from
# -b main → sets the default branch name to "main"
git init -b main --bare .git/local-submodules/Middlewares.git
git init -b main --bare .git/local-submodules/PowerAut0mater.git
git init -b main --bare .git/local-submodules/Shared.git
Bare repos need at least one commit before they can be used as submodule sources.
Clone each into /tmp, make an empty commit, push back, then clean up:
# Clone the bare repo into /tmp so we have a working tree to commit from
# This creates a temporary normal (non-bare) clone at /tmp/Middlewares
git clone .git/local-submodules/Middlewares.git /tmp/Middlewares

cd /tmp/Middlewares

# Create an empty commit (no files needed) to give the bare repo a valid HEAD
# --allow-empty → normally Git refuses commits with no changes; this flag bypasses that
git commit --allow-empty -m "init"

# Push the empty commit back into the bare repo
# This is what makes the bare repo usable as a submodule source
git push

cd /projects

# Repeat the same process for PowerAut0mater
git clone .git/local-submodules/PowerAut0mater.git /tmp/PowerAut0mater
cd /tmp/PowerAut0mater && git commit --allow-empty -m "init" && git push && cd /projects

# Repeat the same process for Shared
git clone .git/local-submodules/Shared.git /tmp/Shared
cd /tmp/Shared && git commit --allow-empty -m "init" && git push && cd /projects

# Delete all three temporary clones — only needed them to seed the bare repos
# -r → recursive (required for directories)
# -f → force (skip confirmation prompts)
rm -rf /tmp/Middlewares /tmp/PowerAut0mater /tmp/Shared
Step 3 — Add Submodules to the Main Repo
# Register each bare repo as a submodule of the main repo
# git submodule add <url> <folder>
#   <url>    → path to the submodule's git repo (local path or remote URL)
#   <folder> → where it will appear in the working tree
#
# This command does three things automatically:
#   1. Clones the bare repo into the specified folder
#   2. Creates / updates the .gitmodules file with the path <-> url mapping
#   3. Stages both the .gitmodules change and the new submodule folder pointer
#
# ⚠️  IMPORTANT: the URL must explicitly start with ./
#     Git requires local paths to begin with ./ or ../
#     to distinguish them from remote hostnames
#
#     ❌ git submodule add .git/local-submodules/Middlewares.git Middlewares
#        fatal: repo URL: must be absolute or begin with ./|../
#
#     ✅ git submodule add ./.git/local-submodules/Middlewares.git Middlewares
#        Cloning into '...' done.
git submodule add ./.git/local-submodules/Middlewares.git Middlewares
git submodule add ./.git/local-submodules/PowerAut0mater.git PowerAut0mater
git submodule add ./.git/local-submodules/Shared.git Shared
Step 4 — Initial Commit
# Stage everything: .gitmodules + all three submodule folder pointers
git add .

# Commit — this snapshot records which exact commit each submodule is pinned to
git commit -m "Initial commit with submodules"
Step 5 — Verify
# Print the contents of .gitmodules to confirm all three submodules are registered
# .gitmodules is the config file Git uses to track submodule paths and their source URLs
cat .gitmodules
Expected output:
[submodule "Middlewares"]
    path = Middlewares
    url = ./.git/local-submodules/Middlewares.git

[submodule "PowerAut0mater"]
    path = PowerAut0mater
    url = ./.git/local-submodules/PowerAut0mater.git

[submodule "Shared"]
    path = Shared
    url = ./.git/local-submodules/Shared.git
Later — Switching to Real Remote URLs
When you have real remote URLs, run the following from inside the main repo:
Step A — Update the URLs
# Update the URL for each submodule inside .gitmodules
# This only edits the config file — it does NOT yet affect the live local clone
git submodule set-url Middlewares https://github.com/you/Middlewares.git
git submodule set-url PowerAut0mater https://github.com/you/PowerAut0mater.git
git submodule set-url Shared https://github.com/you/Shared.git
Step B — Sync and Update
# Propagate the URL changes from .gitmodules into .git/config
# Without this, Git still uses the OLD URLs internally even though .gitmodules was updated
#
# .gitmodules = "source of truth" (tracked file, shared with the whole team via commits)
# .git/config  = "active runtime config" (local only, NOT tracked by Git)
#
# sync reads .gitmodules and writes the new URLs into .git/config to make them active
git submodule sync

# Stage the updated .gitmodules so the URL change is recorded in history
git add .gitmodules

# Commit the URL change so teammates get the correct URLs when they pull
git commit -m "Update submodule remote URLs"

# Fetch and checkout the correct commit for each submodule from the new remote URLs
# --init      → initializes any submodule not yet set up locally (safe to re-run anytime)
# --recursive → also handles nested submodules (submodules inside submodules)
git submodule update --init --recursive
Step C — Optional Cleanup
# Remove the temporary bare repos — no longer referenced by anything
# All submodules now point to real remote URLs so this folder is dead weight
rm -rf .git/local-submodules
Your final structure is exactly:
.
├── .git
├── .gitmodules
├── Middlewares      (submodule → real remote)
├── PowerAut0mater   (submodule → real remote)
└── Shared           (submodule → real remote)
Quick Reference
| Stage | Command | What it does |
|---|---|---|
| Init main repo | git init -b main | Creates .git/, sets default branch to main |
| Create bare repos | git init -b main --bare .git/local-submodules/<n>.git | Repo with no working tree — push/clone only |
| Seed bare repo | clone → empty commit → push → rm temp | Gives bare repo a valid HEAD so it can be used as a source |
| Add submodule | git submodule add ./<url> <folder> | Clones + registers path and url in .gitmodules |
| Update to real URL | git submodule set-url <n> <url> | Edits .gitmodules with the new remote URL |
| Sync URLs | git submodule sync | Copies URLs from .gitmodules into .git/config (makes them active) |
| Pull from remotes | git submodule update --init --recursive | Fetches and checks out correct commit from remote |
| Cleanup temp repos | rm -rf .git/local-submodules | Deletes local bare repos, no longer needed |
Configure Azure (SAML as idP) For PowerSchool

| Component | Role |
|---|---|
| PowerSchool | Service Provider (SP) |
| Azure AD (Entra ID) | Identity Provider (IdP) |
| User | Browser-based authentication |
- PowerSchool can only be setup to point to one and only one SAML identity provider.
- PowerSchool SIS currently supports only one IdP at a time
- SAML/WS-Trust
- OIDC/OpenID Connect
user IDattribute is used in the SAML authentication arepsguidaka ‘PowerSchool’s own global unique identifiers’state-idaka ‘State identifiers’
PowerSchool will expect an authenticationId attribute from the identity provider during a successful single sign-on
| User Type | Attribute | Value | Source |
|---|---|---|---|
| admin | authenticationId | psguid U | SERS.PSGUID |
| admin | authenticationId | state-id | USERS.SIF_STATEPRID |
| guardian | authenticationId | psguid | GUARDIAN.PSGUID |
| guardian | authenticationId | state-id | GUARDIAN.STATE_GUARDIANNUMBER |
| student | authenticationId | psguid | STUDENTS.PSGUID |
| student | authenticationId | state-id | STUDENTS.STATE_STUDENTNUMBER |
| teacher | authenticationId | psguid | USERS.PSGUID |
| teacher | authenticationId | state-id | USERS.SIF_STATEPRID |
Step 1: PowerSchool SSO Plugin
plugin.xml
<?xml version="1.0" encoding="UTF-8"?>
<plugin xmlns="http://plugin.powerschool.pearson.com"
    xmlns:xsi="http://www.w3.org/2001/XMLSchema-instance"
    xsi:schemaLocation="http://plugin.powerschool.pearson.com plugin.xsd"
    name="Azure SSO - SAML IdP" version="1.0.2" description="Azure SSO - SAML as IdP Plugin">
    <saml
        name="mantle-test-powerschool"
        idp-name="azure-identity-provider"
        idp-entity-id="https://sts.windows.net/<tenant_id>"
        idp-metadata-url="https://login.microsoftonline.com/<tenant_id>/federationmetadata/2007-06/federationmetadata.xml?appid=<app_id>">
        <attributes>
            <user type="teacher">
                <attribute name="authenticationId" attribute-value="state-id" />
                <!-- <attribute name="authenticationId" attribute-value="psguid" /> -->
            </user>
            <user type="admin">
                <attribute name="authenticationId" attribute-value="state-id" />
                <!-- <attribute name="authenticationId" attribute-value="psguid" /> -->
            </user>
            <user type="student">
                <attribute name="authenticationId" attribute-value="state-id" />
                <!-- <attribute name="authenticationId" attribute-value="psguid" /> -->
            </user>
            <user type="guardian">
                <attribute name="authenticationId" attribute-value="state-id" />
                <!-- <attribute name="authenticationId" attribute-value="psguid" /> -->
            </user>
        </attributes>
    </saml>
    <publisher name="PrincePARK">
        <contact email="prince_ppy@yahoo.com"></contact>
    </publisher>
</plugin>
saml Attributes
| Property | Description | Can Modify |
|---|---|---|
| name | The name of the service provider. Must provide a short name that will become part of the addresses used during SAML communication. | No |
| idp-name | The name of the identity provider. | Yes |
| idp-entity-id | The entity ID of the identity provider. Defined in the form of a URI. | Yes |
| idp-metadata-url | The URL from which the PowerSchool can obtain a copy of the identity provider metadata. . | Yes |
The identity provider must also be configured to return an authenticationId attribute on a successful single-sign on. This attribute must contain the either or identifier (as defined in the plugin).
From https://sts.windows.net/<tenant_id> and https://login.microsoftonline.com/<tenant_id>/federationmetadata/2007-06/federationmetadata.xml?appid=<app_id>">, <tenant_id> and <app_id> wil be replaced by the respective value
Step 2: Plugin Installation
- Install the
Azure SSO - SAML IdPPlugin to PowerSchool - Enable the plugin
- Restart the PowerSchool Instance
Step 3: Plugin Configuration
Open PowerSchool Plugin Page > ‘SAML Service Provider Setup’ Page
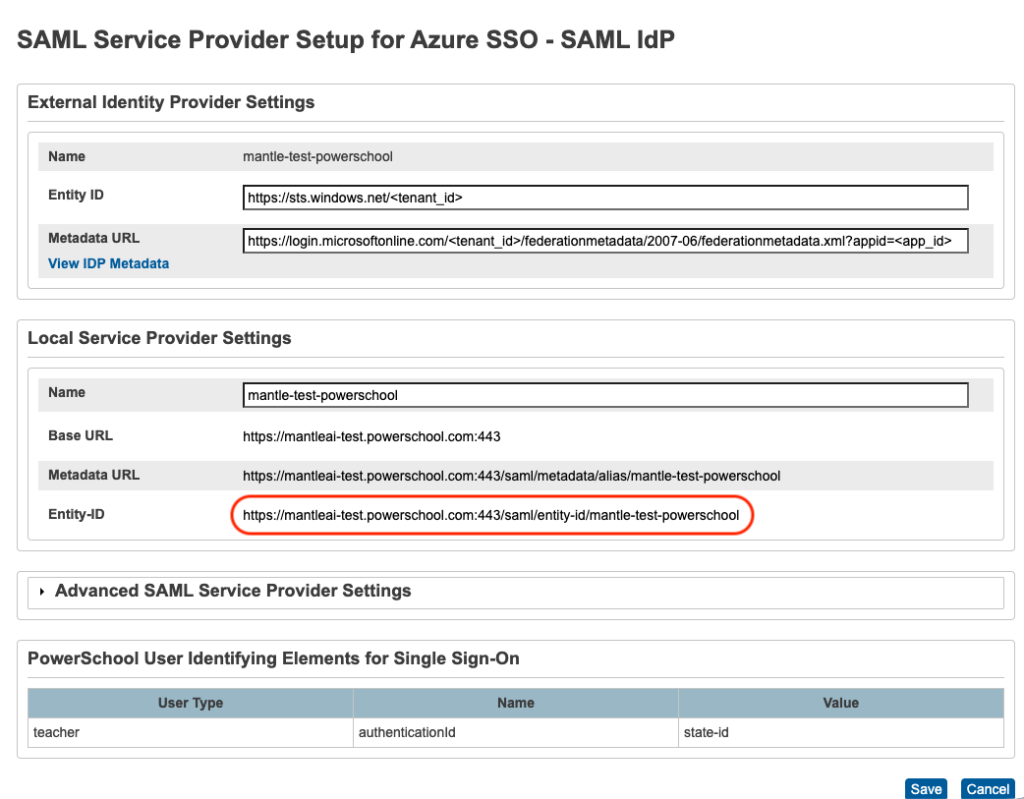
Local Service Provider Settings > Name field serve as the entity_key for the Azure Single Sign On > Identifier (Entity ID)
Step 4: Configuring Azure SAML IdP
- Azure Portal → Enterprise Applications
- Create Non-gallery new application (app name
PowerSchool SSO) - Enable Single Sign-On
- Select
SAML - from
Set up Single Sign-On with SAMLConfigure Basic SAML Settings (Azure)- Identifier (Entity ID) → from PowerSchool
https://mantleai-test.powerschool.com:443/saml/entity-id/mantle-test-powerschool - Reply URL (ACS URL) → from PowerSchool
https://mantleai-test.powerschool.com:443/saml/SSO/alias/mantle-test-powerschool
- Identifier (Entity ID) → from PowerSchool
- from
Set up Single Sign-On with SAMLConfigure Claims & Attributes
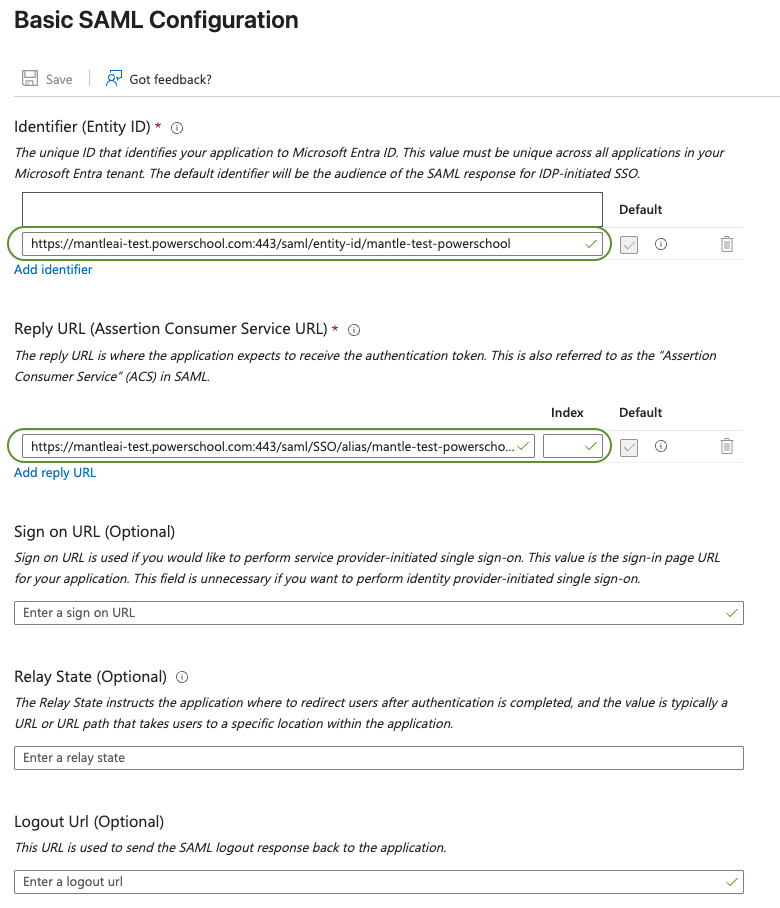
Typical PowerSchool-required claims:
| Claim | Azure Source |
|---|---|
| Unique User Identifier (Name ID) | user.userprincipalname |
| emailaddress | user.mail |
| givenname | user.givenname |
| name | user.userprincipalname |
| surname | user.surname |
Make Sure the below claim is avaliable
| Claim | Azure Source |
|---|---|
| authenticationId | user.mail |
Step 5: Finish PowerSchool Plugin SAML Service Provider Setup
From Azure Set up Single Sign-On with SAML page copy App Federation Metadata Url and Microsoft Entra Identifier
Open PowerSchool Plugin Page > ‘SAML Service Provider Setup’ Page,
- Copy
Microsoft Entra Identifierfrom Azure to External Identity Provider Settings >Entity IDin PowerSchoolSAML Service Provider SetupPage - Copy
App Federation Metadata Urlfrom Azure to External Identity Provider Settings >Metadata URLin PowerSchoolSAML Service Provider SetupPage
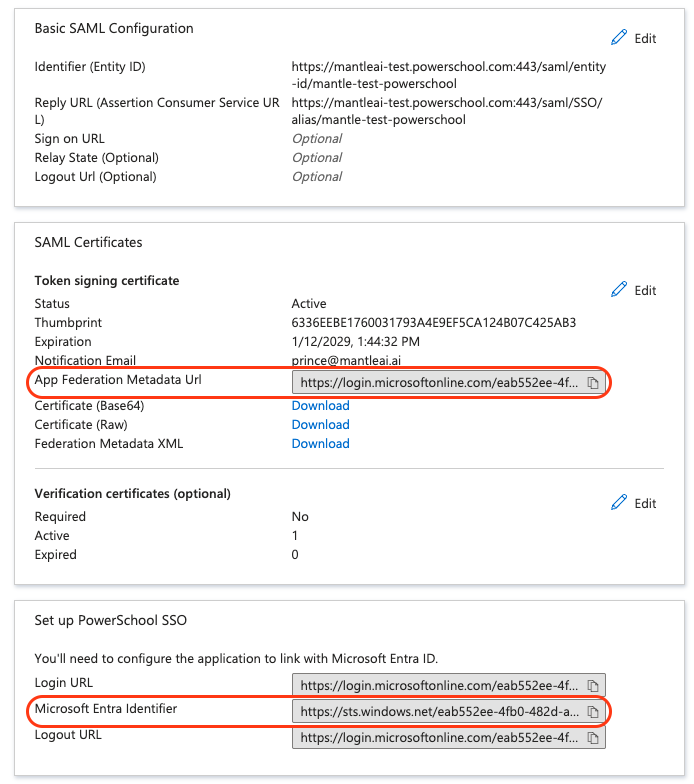
Notes Assertion Consumer Service (ACS) URL: Where Azure sends the SAML response
Traefik with Static Wildcard and Dynamic Let’s Encrypt Certificates
A comprehensive guide for configuring Traefik to use both static wildcard certificates and dynamic Let’s Encrypt certificates simultaneously.
Table of Contents
- Overview
- How Certificate Selection Works
- Quick Reference Table
- Directory Structure
- Configuration Files
- Step-by-Step Setup
- Docker Label Patterns
- Common Scenarios
- Certificate Selection Decision Tree
- Testing and Verification
- Troubleshooting
- Certificate Management
- Security Best Practices
- Advanced Configuration
Overview
This configuration enables Traefik to:
- Use a static wildcard certificate for all
*.apps.abc.comdomains - Automatically obtain and manage Let’s Encrypt certificates for other domains (e.g.,
app1.com,app2.com) - Automatically select the correct certificate based on the domain being accessed
Use Cases
- Internal applications: Use wildcard certificate for
*.apps.abc.com(webapp.apps.abc.com, api.apps.abc.com, etc.) - Customer-facing domains: Use Let’s Encrypt for
app1.com,app2.com, etc. - Mixed environments: Same application accessible via both internal and external domains
How Certificate Selection Works
Traefik automatically selects certificates using this priority logic:
┌─────────────────────────────────────────────────────────────┐
│ Incoming HTTPS Request for domain: example.com              │
└──────────────────┬──────────────────────────────────────────┘
                   │
                   ▼
┌─────────────────────────────────────────────────────────────┐
│ Step 1: Does domain match *.apps.abc.com pattern?           │
└──────────────────┬──────────────────────────────────────────┘
                   │
          ┌────────┴─────────┐
          │                  │
         YES                NO
          │                  │
          ▼                  ▼
    ┌──────────┐      ┌──────────────────────────────────────┐
    │ USE      │      │ Step 2: Is certresolver specified?   │
    │ STATIC   │      └────────┬─────────────────────────────┘
    │ WILDCARD │               │
    │ CERT     │      ┌────────┴──────┐
    └──────────┘      │               │
                     YES             NO
                      │               │
                      ▼               ▼
               ┌──────────────┐  ┌──────────┐
               │ USE/REQUEST  │  │ ERROR    │
               │ LET'S        │  │ or       │
               │ ENCRYPT      │  │ DEFAULT  │
               │ CERT         │  │ CERT     │
               └──────────────┘  └──────────┘
Certificate Matching Examples
| Domain | Matches Pattern? | Label Config | Certificate Used |
|---|---|---|---|
webapp.apps.abc.com |
✅ Yes (*.apps.abc.com) | tls=true |
Static Wildcard |
api.apps.abc.com |
✅ Yes (*.apps.abc.com) | tls=true |
Static Wildcard |
admin.apps.abc.com |
✅ Yes (*.apps.abc.com) | tls=true |
Static Wildcard |
app1.com |
❌ No | tls.certresolver=letsencrypt |
Let’s Encrypt |
app2.com |
❌ No | tls.certresolver=letsencrypt |
Let’s Encrypt |
www.app1.com |
❌ No | tls.certresolver=letsencrypt |
Let’s Encrypt |
Quick Reference Table
The Two Label Patterns
| Certificate Type | Domain Examples | Docker Label | Auto-Renewal |
|---|---|---|---|
| Static Wildcard | *.apps.abc.com |
tls=true |
❌ Manual |
| Dynamic Let’s Encrypt | app1.com, app2.com |
tls.certresolver=letsencrypt |
✅ Automatic |
Critical Label Difference
✅ CORRECT for *.apps.abc.com:
- "traefik.http.routers.myapp.tls=true" # No certresolver
❌ WRONG for *.apps.abc.com:
- "traefik.http.routers.myapp.tls.certresolver=letsencrypt" # Will bypass wildcard!
✅ CORRECT for app1.com:
- "traefik.http.routers.app1.tls.certresolver=letsencrypt" # With certresolver
❌ WRONG for app1.com:
- "traefik.http.routers.app1.tls=true" # Won't get Let's Encrypt cert
Directory Structure
Create the following directory structure on your host:
traefik/
├── docker-compose.yml                  # Traefik service definition
├── traefik.yml                         # Static configuration
├── dynamic/                            # Dynamic configuration files
│   └── tls-certificates.yml           # Static wildcard certificate config
├── certs/                              # Your static certificates
│   └── wildcard.apps.abc.com/
│       ├── fullchain.pem              # Certificate + intermediate chain
│       └── privkey.pem                # Private key
├── letsencrypt/                        # Let's Encrypt storage (auto-generated)
│   └── acme.json                      # Auto-created, stores LE certificates
└── logs/                               # Traefik logs
    ├── traefik.log
    └── access.log
Configuration Files
1. Traefik Static Configuration
File: traefik.yml
# Traefik Static Configuration
# Main configuration file

global:
  checkNewVersion: true
  sendAnonymousUsage: false

api:
  dashboard: true
  insecure: false

entryPoints:
  web:
    address: ":80"
    http:
      redirections:
        entryPoint:
          to: websecure
          scheme: https
          permanent: true

  websecure:
    address: ":443"

providers:
  docker:
    endpoint: "unix:///var/run/docker.sock"
    exposedByDefault: false
    network: web
    watch: true

  # File provider for static wildcard certificate
  file:
    directory: "/etc/traefik/dynamic"
    watch: true

# Let's Encrypt Configuration for Dynamic Certificates
certificatesResolvers:
  letsencrypt:
    acme:
      email: "your-email@example.com" # ← CHANGE THIS
      storage: "/letsencrypt/acme.json"

      # HTTP Challenge (recommended for simple setups)
      httpChallenge:
        entryPoint: web

      # OR TLS Challenge (uncomment if preferred)
      # tlsChallenge: {}

      # OR DNS Challenge (uncomment for wildcard LE certs or firewall scenarios)
      # dnsChallenge:
      #   provider: cloudflare  # or your DNS provider
      #   delayBeforeCheck: 0
      #   resolvers:
      #     - "1.1.1.1:53"
      #     - "8.8.8.8:53"

log:
  level: INFO
  filePath: "/var/log/traefik/traefik.log"

accessLog:
  filePath: "/var/log/traefik/access.log"
Important: Change your-email@example.com to your actual email address for Let’s Encrypt notifications.
2. Dynamic TLS Configuration
File: dynamic/tls-certificates.yml
# Dynamic TLS Configuration
# Defines your static wildcard certificate for *.apps.abc.com

tls:
  certificates:
    # Static WILDCARD certificate for *.apps.abc.com
    - certFile: /etc/traefik/certs/wildcard.apps.abc.com/fullchain.pem
      keyFile: /etc/traefik/certs/wildcard.apps.abc.com/privkey.pem
      stores:
        - default

  stores:
    default:
      defaultCertificate:
        # Optional: Set a default fallback certificate
        certFile: /etc/traefik/certs/wildcard.apps.abc.com/fullchain.pem
        keyFile: /etc/traefik/certs/wildcard.apps.abc.com/privkey.pem

  options:
    default:
      minVersion: VersionTLS12
      sniStrict: true
      cipherSuites:
        - TLS_ECDHE_RSA_WITH_AES_128_GCM_SHA256
        - TLS_ECDHE_RSA_WITH_AES_256_GCM_SHA384
        - TLS_ECDHE_RSA_WITH_CHACHA20_POLY1305
        - TLS_AES_128_GCM_SHA256
        - TLS_AES_256_GCM_SHA384
        - TLS_CHACHA20_POLY1305_SHA256
3. Docker Compose for Traefik
File: docker-compose.yml
version: "3.8"

services:
  traefik:
    image: traefik:v2.10
    container_name: traefik
    restart: unless-stopped
    security_opt:
      - no-new-privileges:true
    networks:
      - web
    ports:
      - "80:80"
      - "443:443"
    volumes:
      # Traefik static configuration
      - ./traefik.yml:/traefik.yml:ro

      # Dynamic configuration directory
      - ./dynamic:/etc/traefik/dynamic:ro

      # Static wildcard certificate
      - ./certs:/etc/traefik/certs:ro

      # Let's Encrypt certificate storage
      - ./letsencrypt:/letsencrypt

      # Logs
      - ./logs:/var/log/traefik

      # Docker socket
      - /var/run/docker.sock:/var/run/docker.sock:ro
    labels:
      - "traefik.enable=true"

      # Dashboard (uses static wildcard certificate)
      - "traefik.http.routers.traefik.rule=Host(`traefik.apps.abc.com`)"
      - "traefik.http.routers.traefik.service=api@internal"
      - "traefik.http.routers.traefik.entrypoints=websecure"
      - "traefik.http.routers.traefik.tls=true"

      # Dashboard authentication
      # Generate password: echo $(htpasswd -nb admin yourpassword) | sed -e s/\\$/\\$\\$/g
      - "traefik.http.routers.traefik.middlewares=auth"
      - "traefik.http.middlewares.auth.basicauth.users=admin:$$apr1$$8evjzfst$$YgiYLjSK1e5RJTyNvR4QH0"

networks:
  web:
    external: true
# Create the network first: docker network create web
4. Example Application Configurations
File: docker-compose-apps.yml (separate file for your applications)
version: "3.8"

services:
  # ================================================================
  # APPS USING STATIC WILDCARD CERTIFICATE (*.apps.abc.com)
  # ================================================================

  # Example 1: Web application on *.apps.abc.com
  webapp:
    image: nginx:alpine
    container_name: webapp
    restart: unless-stopped
    networks:
      - web
    labels:
      - "traefik.enable=true"
      - "traefik.http.routers.webapp.rule=Host(`webapp.apps.abc.com`)"
      - "traefik.http.routers.webapp.entrypoints=websecure"
      # Key: tls=true WITHOUT certresolver
      - "traefik.http.routers.webapp.tls=true"
      - "traefik.http.services.webapp.loadbalancer.server.port=80"

  # Example 2: API on *.apps.abc.com
  api:
    image: nginx:alpine
    container_name: api
    restart: unless-stopped
    networks:
      - web
    labels:
      - "traefik.enable=true"
      - "traefik.http.routers.api.rule=Host(`api.apps.abc.com`)"
      - "traefik.http.routers.api.entrypoints=websecure"
      - "traefik.http.routers.api.tls=true"
      - "traefik.http.services.api.loadbalancer.server.port=80"

  # Example 3: Admin panel on *.apps.abc.com
  admin:
    image: nginx:alpine
    container_name: admin
    restart: unless-stopped
    networks:
      - web
    labels:
      - "traefik.enable=true"
      - "traefik.http.routers.admin.rule=Host(`admin.apps.abc.com`)"
      - "traefik.http.routers.admin.entrypoints=websecure"
      - "traefik.http.routers.admin.tls=true"
      - "traefik.http.services.admin.loadbalancer.server.port=80"

  # ================================================================
  # APPS USING DYNAMIC LET'S ENCRYPT CERTIFICATES
  # ================================================================

  # Example 4: App1 with Let's Encrypt certificate
  app1:
    image: nginx:alpine
    container_name: app1
    restart: unless-stopped
    networks:
      - web
    labels:
      - "traefik.enable=true"
      - "traefik.http.routers.app1.rule=Host(`app1.com`) || Host(`www.app1.com`)"
      - "traefik.http.routers.app1.entrypoints=websecure"
      # Key: tls.certresolver=letsencrypt
      - "traefik.http.routers.app1.tls.certresolver=letsencrypt"
      - "traefik.http.services.app1.loadbalancer.server.port=80"

  # Example 5: App2 with Let's Encrypt certificate
  app2:
    image: nginx:alpine
    container_name: app2
    restart: unless-stopped
    networks:
      - web
    labels:
      - "traefik.enable=true"
      - "traefik.http.routers.app2.rule=Host(`app2.com`) || Host(`www.app2.com`)"
      - "traefik.http.routers.app2.entrypoints=websecure"
      - "traefik.http.routers.app2.tls.certresolver=letsencrypt"
      - "traefik.http.services.app2.loadbalancer.server.port=80"

  # Example 6: App3 with Let's Encrypt certificate
  app3:
    image: nginx:alpine
    container_name: app3
    restart: unless-stopped
    networks:
      - web
    labels:
      - "traefik.enable=true"
      - "traefik.http.routers.app3.rule=Host(`app3.com`)"
      - "traefik.http.routers.app3.entrypoints=websecure"
      - "traefik.http.routers.app3.tls.certresolver=letsencrypt"
      - "traefik.http.services.app3.loadbalancer.server.port=80"

  # ================================================================
  # SPECIAL CASE: App accessible via both certificate types
  # ================================================================

  # Example 7: App with both internal and external domains
  multiapp:
    image: nginx:alpine
    container_name: multiapp
    restart: unless-stopped
    networks:
      - web
    labels:
      - "traefik.enable=true"

      # Router 1: Internal access (static wildcard)
      - "traefik.http.routers.multiapp-internal.rule=Host(`multi.apps.abc.com`)"
      - "traefik.http.routers.multiapp-internal.entrypoints=websecure"
      - "traefik.http.routers.multiapp-internal.tls=true"
      - "traefik.http.routers.multiapp-internal.service=multiapp"

      # Router 2: External access (Let's Encrypt)
      - "traefik.http.routers.multiapp-external.rule=Host(`multiapp.com`)"
      - "traefik.http.routers.multiapp-external.entrypoints=websecure"
      - "traefik.http.routers.multiapp-external.tls.certresolver=letsencrypt"
      - "traefik.http.routers.multiapp-external.service=multiapp"

      # Shared service definition
      - "traefik.http.services.multiapp.loadbalancer.server.port=80"

networks:
  web:
    external: true
Step-by-Step Setup
Step 1: Create Directory Structure
# Create directories
mkdir -p traefik/{dynamic,certs/wildcard.apps.abc.com,letsencrypt,logs}
cd traefik
Step 2: Place Your Wildcard Certificate
# Copy your wildcard certificate files
cp /path/to/your/wildcard-fullchain.pem certs/wildcard.apps.abc.com/fullchain.pem
cp /path/to/your/wildcard-privkey.pem certs/wildcard.apps.abc.com/privkey.pem

# Verify the files exist
ls -la certs/wildcard.apps.abc.com/
Note: Your certificate must be valid for *.apps.abc.com (wildcard).
Step 3: Set Permissions for Let’s Encrypt Storage
# Create acme.json with correct permissions
touch letsencrypt/acme.json
chmod 600 letsencrypt/acme.json
Critical: The acme.json file must have 600 permissions or Traefik will refuse to start.
Step 4: Create Configuration Files
Create the following files with the content from the Configuration Files section:
traefik.yml(main configuration)dynamic/tls-certificates.yml(wildcard certificate definition)docker-compose.yml(Traefik deployment)
Important: Update the email address in traefik.yml:
email: "your-email@example.com" # ← Change this
Step 5: Create Docker Network
docker network create web
This network will be shared by Traefik and all your applications.
Step 6: Deploy Traefik
# Start Traefik
docker-compose up -d

# Check logs
docker logs traefik

# Follow logs
docker logs -f traefik
Step 7: Verify Traefik is Running
# Check container status
docker ps | grep traefik

# Check if wildcard certificate is loaded
docker logs traefik | grep -i certificate
You should see messages like:
Configuration loaded from file: /traefik.yml
Loading certificate from file: /etc/traefik/certs/wildcard.apps.abc.com/fullchain.pem
Step 8: Deploy Your First Application
Create a simple test application:
# test-app.yml
version: "3.8"

services:
  test:
    image: nginx:alpine
    container_name: test-app
    networks:
      - web
    labels:
      - "traefik.enable=true"
      - "traefik.http.routers.test.rule=Host(`test.apps.abc.com`)"
      - "traefik.http.routers.test.entrypoints=websecure"
      - "traefik.http.routers.test.tls=true"
      - "traefik.http.services.test.loadbalancer.server.port=80"

networks:
  web:
    external: true
# Deploy test app
docker-compose -f test-app.yml up -d

# Test it (replace with your server IP)
curl -k https://test.apps.abc.com
Step 9: Verify Certificate
# Check which certificate is being served
echo | openssl s_client -servername test.apps.abc.com -connect YOUR_SERVER_IP:443 2>/dev/null | openssl x509 -noout -subject -issuer -dates
Docker Label Patterns
Pattern 1: Static Wildcard Certificate (*.apps.abc.com)
Use this for any subdomain of apps.abc.com:
labels:
  - "traefik.enable=true"
  - "traefik.http.routers.ROUTER_NAME.rule=Host(`subdomain.apps.abc.com`)"
  - "traefik.http.routers.ROUTER_NAME.entrypoints=websecure"
  - "traefik.http.routers.ROUTER_NAME.tls=true" # ← No certresolver
  - "traefik.http.services.SERVICE_NAME.loadbalancer.server.port=PORT"
Key Points:
- Use
tls=true(without certresolver) - Traefik automatically uses the static wildcard certificate
- Works for:
webapp.apps.abc.com,api.apps.abc.com,anything.apps.abc.com
Pattern 2: Dynamic Let’s Encrypt Certificate
Use this for custom domains like app1.com, app2.com:
labels:
  - "traefik.enable=true"
  - "traefik.http.routers.ROUTER_NAME.rule=Host(`app1.com`)"
  - "traefik.http.routers.ROUTER_NAME.entrypoints=websecure"
  - "traefik.http.routers.ROUTER_NAME.tls.certresolver=letsencrypt" # ← With certresolver
  - "traefik.http.services.SERVICE_NAME.loadbalancer.server.port=PORT"
Key Points:
- Use
tls.certresolver=letsencrypt - Traefik automatically requests certificate from Let’s Encrypt
- Certificate is automatically renewed
- Can include multiple domains:
Host(\app1.com`) || Host(`www.app1.com`)`
Pattern 3: Multiple Domains with Different Certificates
labels:
  - "traefik.enable=true"

  # Router 1: Internal domain (static wildcard)
  - "traefik.http.routers.app-internal.rule=Host(`app.apps.abc.com`)"
  - "traefik.http.routers.app-internal.entrypoints=websecure"
  - "traefik.http.routers.app-internal.tls=true"
  - "traefik.http.routers.app-internal.service=app"

  # Router 2: External domain (Let's Encrypt)
  - "traefik.http.routers.app-external.rule=Host(`app.com`)"
  - "traefik.http.routers.app-external.entrypoints=websecure"
  - "traefik.http.routers.app-external.tls.certresolver=letsencrypt"
  - "traefik.http.routers.app-external.service=app"

  # Service (shared)
  - "traefik.http.services.app.loadbalancer.server.port=3000"
Common Scenarios
Scenario 1: Simple Internal Web Application
services:
  myapp:
    image: myapp:latest
    networks:
      - web
    labels:
      - "traefik.enable=true"
      - "traefik.http.routers.myapp.rule=Host(`myapp.apps.abc.com`)"
      - "traefik.http.routers.myapp.entrypoints=websecure"
      - "traefik.http.routers.myapp.tls=true"
      - "traefik.http.services.myapp.loadbalancer.server.port=3000"
Result: Uses static wildcard certificate *.apps.abc.com
Scenario 2: Customer-Facing Application
services:
  customer-app:
    image: customer-app:latest
    networks:
      - web
    labels:
      - "traefik.enable=true"
      - "traefik.http.routers.customer.rule=Host(`myapp.com`) || Host(`www.myapp.com`)"
      - "traefik.http.routers.customer.entrypoints=websecure"
      - "traefik.http.routers.customer.tls.certresolver=letsencrypt"
      - "traefik.http.services.customer.loadbalancer.server.port=80"
Result: Traefik automatically requests and manages Let’s Encrypt certificate for myapp.com and www.myapp.com
Scenario 3: API with Authentication Middleware
services:
  api:
    image: api:latest
    networks:
      - web
    labels:
      - "traefik.enable=true"
      - "traefik.http.routers.api.rule=Host(`api.apps.abc.com`)"
      - "traefik.http.routers.api.entrypoints=websecure"
      - "traefik.http.routers.api.tls=true"
      - "traefik.http.routers.api.middlewares=api-auth"
      - "traefik.http.middlewares.api-auth.basicauth.users=user:$$apr1$$..."
      - "traefik.http.services.api.loadbalancer.server.port=8080"
Result: Uses static wildcard certificate with basic authentication
Scenario 4: Application with Custom Headers
services:
  webapp:
    image: webapp:latest
    networks:
      - web
    labels:
      - "traefik.enable=true"
      - "traefik.http.routers.webapp.rule=Host(`webapp.apps.abc.com`)"
      - "traefik.http.routers.webapp.entrypoints=websecure"
      - "traefik.http.routers.webapp.tls=true"
      - "traefik.http.routers.webapp.middlewares=webapp-headers"
      - "traefik.http.middlewares.webapp-headers.headers.customrequestheaders.X-Custom-Header=value"
      - "traefik.http.services.webapp.loadbalancer.server.port=80"
Certificate Selection Decision Tree
User accesses: https://example.apps.abc.com
                        │
                        ▼
┌──────────────────────────────────────────────┐
│ Does "example.apps.abc.com" match            │
│ wildcard pattern "*.apps.abc.com"?           │
└──────────────────┬───────────────────────────┘
                   │
          ┌────────┴─────────┐
          │                  │
        YES                 NO
          │                  │
          ▼                  ▼
┌─────────────────┐  ┌──────────────────────────┐
│ Check router    │  │ Check if router has      │
│ configuration   │  │ certresolver defined     │
└────────┬────────┘  └──────────┬───────────────┘
         │                      │
         ▼                      ▼
┌─────────────────┐  ┌──────────────────────────┐
│ Has tls=true    │  │ certresolver=letsencrypt │
│ (no resolver)?  │  │                          │
└────────┬────────┘  └──────────┬───────────────┘
         │                      │
         ▼                      ▼
┌─────────────────┐  ┌──────────────────────────┐
│ USE STATIC      │  │ Check acme.json for      │
│ WILDCARD CERT   │  │ existing certificate     │
│ *.apps.abc.com  │  └──────────┬───────────────┘
└─────────────────┘             │
                       ┌────────┴─────────┐
                       │                  │
                   EXISTS            DOESN'T EXIST
                       │                  │
                       ▼                  ▼
              ┌─────────────────┐  ┌──────────────┐
              │ USE EXISTING    │  │ REQUEST NEW  │
              │ LET'S ENCRYPT   │  │ CERTIFICATE  │
              │ CERTIFICATE     │  │ FROM LE      │
              └─────────────────┘  └──────────────┘
Testing and Verification
Test 1: Verify Wildcard Certificate is Loaded
# Check Traefik logs for certificate loading
docker logs traefik | grep -i "certificate"

# Expected output:
# Loading certificate from file: /etc/traefik/certs/wildcard.apps.abc.com/fullchain.pem
Test 2: Check Certificate Details
# Check what certificate is served for a *.apps.abc.com domain
echo | openssl s_client -servername test.apps.abc.com -connect YOUR_SERVER_IP:443 2>/dev/null | openssl x509 -noout -text | grep -A2 "Subject Alternative Name"

# Expected output for wildcard:
# DNS:*.apps.abc.com
Test 3: Verify Let’s Encrypt Certificate
# Check certificate issuer for a custom domain
echo | openssl s_client -servername app1.com -connect YOUR_SERVER_IP:443 2>/dev/null | openssl x509 -noout -issuer

# Expected output:
# issuer=C=US, O=Let's Encrypt, CN=...
Test 4: Check All Certificates in Traefik
# View Let's Encrypt certificates
docker exec traefik cat /letsencrypt/acme.json | jq '.letsencrypt.Certificates[] | {domains: .domain.main}'

# View static wildcard certificate
docker exec traefik openssl x509 -in /etc/traefik/certs/wildcard.apps.abc.com/fullchain.pem -noout -text
Test 5: Test HTTPS Connection
# Test with curl
curl -I https://test.apps.abc.com

# Expected: HTTP/2 200 (or appropriate status)

# Test certificate validation
curl -v https://test.apps.abc.com 2>&1 | grep -E "subject|issuer|SSL"
Test 6: Access Traefik Dashboard
# Access dashboard (replace with your server IP or domain)
https://traefik.apps.abc.com/dashboard/

# Default credentials (if you didn't change them):
# Username: admin
# Password: password (from the bcrypt hash in docker-compose.yml)
Troubleshooting
Issue 1: Wrong Certificate Being Used
Symptom: *.apps.abc.com domain shows Let’s Encrypt certificate instead of wildcard.
Cause: Using tls.certresolver=letsencrypt instead of tls=true
Solution:
# Change this:
- "traefik.http.routers.X.tls.certresolver=letsencrypt"

# To this:
- "traefik.http.routers.X.tls=true"
Issue 2: Certificate Not Loading
Symptom: Traefik logs show errors about certificate files
Checks:
# 1. Verify files exist
docker exec traefik ls -la /etc/traefik/certs/wildcard.apps.abc.com/

# 2. Check dynamic config is loaded
docker exec traefik cat /etc/traefik/dynamic/tls-certificates.yml

# 3. Verify certificate is valid
docker exec traefik openssl x509 -in /etc/traefik/certs/wildcard.apps.abc.com/fullchain.pem -noout -text

# 4. Check file permissions
ls -la certs/wildcard.apps.abc.com/
Solution:
- Ensure certificate files are readable (644 permissions)
- Verify paths in
tls-certificates.ymlare correct - Check certificate is valid and not expired
Issue 3: Let’s Encrypt Certificate Not Being Requested
Symptom: App accessible via HTTP but not HTTPS, or shows default certificate
Checks:
# 1. Check if certresolver is specified
docker inspect CONTAINER_NAME | grep certresolver

# 2. Check Traefik logs
docker logs traefik | grep -i "acme\|certificate\|error"

# 3. Verify acme.json permissions
ls -la letsencrypt/acme.json
# Must be: -rw------- (600)
Solution:
# Ensure you have:
- "traefik.http.routers.X.tls.certresolver=letsencrypt"

# Not:
- "traefik.http.routers.X.tls=true"
Issue 4: Let’s Encrypt Rate Limit Error
Symptom: Error in logs: too many certificates already issued
Cause: Let’s Encrypt rate limits (50 certificates per domain per week)
Solution:
# Use staging environment for testing
# In traefik.yml:
certificatesResolvers:
  letsencrypt:
    acme:
      caServer: https://acme-staging-v02.api.letsencrypt.org/directory
      # ... rest of config
Note: Staging certificates will show as untrusted in browsers. Remove caServer line for production.
Issue 5: Container Not Getting Certificate
Symptom: Container accessible via HTTP but not HTTPS
Checklist:
- ✅ Container is on the
webnetwork - ✅
traefik.enable=truelabel exists - ✅ Entry point is set to
websecure - ✅ TLS is properly configured
- ✅ DNS points to your server
- ✅ Ports 80 and 443 are open
Verification:
# Check container is on correct network
docker inspect CONTAINER_NAME | grep NetworkMode

# Check container labels
docker inspect CONTAINER_NAME | jq '.[0].Config.Labels'

# Check Traefik sees the container
docker logs traefik | grep CONTAINER_NAME
Issue 6: “Unable to obtain ACME certificate” Error
Symptom: Traefik logs show ACME errors
Common Causes:
- Port 80 not accessible (for HTTP challenge)
- DNS not pointing to server
- Firewall blocking traffic
- Invalid email address
Solution:
# Test port 80 is accessible
curl -I http://YOUR_SERVER_IP

# Test DNS resolution
dig app1.com
nslookup app1.com

# Check firewall
sudo ufw status
sudo iptables -L
Issue 7: Self-Signed Certificate Warning
Symptom: Browser shows “Your connection is not private”
Causes:
- Using Let’s Encrypt staging environment
- Certificate not yet issued
- Wrong certificate being served
Solution:
# 1. Check which certificate is being served
echo | openssl s_client -servername YOUR_DOMAIN -connect YOUR_SERVER_IP:443 2>/dev/null | openssl x509 -noout -issuer

# 2. Wait a few minutes for Let's Encrypt issuance
# Check logs:
docker logs traefik | grep -i acme

# 3. If using staging, remove caServer line from traefik.yml
Issue 8: Wildcard Certificate Not Covering Subdomain
Symptom: Certificate error for domain that should be covered
Important: Wildcard certificates *.apps.abc.com are valid for:
- ✅
test.apps.abc.com - ✅
api.apps.abc.com - ✅
anything.apps.abc.com - ❌
apps.abc.com(base domain) - ❌
sub.test.apps.abc.com(two levels deep)
Solution:
- For base domain: Get separate certificate or include both
apps.abc.comand*.apps.abc.comin certificate - For multi-level: Get certificate that includes multiple levels or use separate certificate
Certificate Management
Updating the Wildcard Certificate
When your wildcard certificate expires or needs renewal:
# 1. Replace certificate files
cp /path/to/new-fullchain.pem certs/wildcard.apps.abc.com/fullchain.pem
cp /path/to/new-privkey.pem certs/wildcard.apps.abc.com/privkey.pem

# 2. Traefik automatically reloads (due to watch: true)
# Verify reload in logs:
docker logs traefik | tail -20

# 3. No restart needed!
Let’s Encrypt Certificate Renewal
Let’s Encrypt certificates are automatically renewed by Traefik:
- Renewal starts 30 days before expiration
- Happens automatically in the background
- No manual intervention required
- Stored in
letsencrypt/acme.json
Monitor renewals:
# Check certificate expiration dates
docker exec traefik cat /letsencrypt/acme.json | jq '.letsencrypt.Certificates[] | {domain: .domain.main, cert: .certificate}' | head -50

# Check Traefik logs for renewal activity
docker logs traefik | grep -i "renew"
Certificate Expiration Monitoring
# Check wildcard certificate expiration
docker exec traefik openssl x509 -in /etc/traefik/certs/wildcard.apps.abc.com/fullchain.pem -noout -enddate

# Check specific Let's Encrypt certificate (from outside)
echo | openssl s_client -servername app1.com -connect YOUR_SERVER_IP:443 2>/dev/null | openssl x509 -noout -dates
Backup Important Files
What to backup:
# 1. Let's Encrypt certificates
cp letsencrypt/acme.json letsencrypt/acme.json.backup

# 2. Static wildcard certificate
tar -czf wildcard-cert-backup.tar.gz certs/

# 3. Configuration files
tar -czf config-backup.tar.gz traefik.yml dynamic/ docker-compose.yml
Restore from backup:
# Restore acme.json
cp letsencrypt/acme.json.backup letsencrypt/acme.json
chmod 600 letsencrypt/acme.json

# Restart Traefik
docker-compose restart traefik
Security Best Practices
1. File Permissions
# acme.json must be 600
chmod 600 letsencrypt/acme.json

# Certificate files should be 644
chmod 644 certs/wildcard.apps.abc.com/*.pem

# Private keys should be 600
chmod 600 certs/wildcard.apps.abc.com/privkey.pem
2. Use Read-Only Mounts
In docker-compose.yml, use :ro for static files:
volumes:
  - ./traefik.yml:/traefik.yml:ro
  - ./dynamic:/etc/traefik/dynamic:ro
  - ./certs:/etc/traefik/certs:ro
3. Enable Dashboard Authentication
Always protect the Traefik dashboard:
# Generate password hash
echo $(htpasswd -nb admin yourpassword) | sed -e s/\\$/\\$\\$/g

# Add to docker-compose.yml
- "traefik.http.middlewares.auth.basicauth.users=admin:HASH"
4. Use Strong TLS Configuration
Already configured in tls-certificates.yml:
- Minimum TLS 1.2
- Strong cipher suites
- SNI strict mode enabled
5. Regular Updates
# Update Traefik image
docker-compose pull
docker-compose up -d

# Check for updates
docker images | grep traefik
6. Monitor Logs
# Watch for security issues
docker logs -f traefik | grep -i "error\|warning\|fail"

# Set up log rotation
# Add to /etc/logrotate.d/traefik:
/path/to/traefik/logs/*.log {
    daily
    rotate 14
    compress
    missingok
    notifempty
}
7. Firewall Configuration
# Allow only necessary ports
sudo ufw allow 80/tcp   # HTTP
sudo ufw allow 443/tcp  # HTTPS
sudo ufw enable

# Block Traefik dashboard from internet (if needed)
# Access via VPN or SSH tunnel
8. Use Secrets for Sensitive Data
For production, use Docker secrets or environment variables:
environment:
  - CLOUDFLARE_EMAIL=${CLOUDFLARE_EMAIL}
  - CLOUDFLARE_API_KEY=${CLOUDFLARE_API_KEY}
Advanced Configuration
Using DNS Challenge for Let’s Encrypt
If you need wildcard Let’s Encrypt certificates or are behind a firewall:
# In traefik.yml
certificatesResolvers:
  letsencrypt:
    acme:
      email: "your-email@example.com"
      storage: "/letsencrypt/acme.json"
      dnsChallenge:
        provider: cloudflare # or your DNS provider
        delayBeforeCheck: 0
        resolvers:
          - "1.1.1.1:53"
          - "8.8.8.8:53"
Required environment variables:
# In docker-compose.yml
environment:
  - CF_API_EMAIL=your-email@example.com
  - CF_API_KEY=your-api-key
  # OR
  - CF_DNS_API_TOKEN=your-api-token
Supported DNS providers: Cloudflare, Route53, DigitalOcean, OVH, GoDaddy, and many more
Multiple Certificate Resolvers
certificatesResolvers:
  letsencrypt-http:
    acme:
      email: "your-email@example.com"
      storage: "/letsencrypt/acme-http.json"
      httpChallenge:
        entryPoint: web

  letsencrypt-dns:
    acme:
      email: "your-email@example.com"
      storage: "/letsencrypt/acme-dns.json"
      dnsChallenge:
        provider: cloudflare
Use in labels:
- "traefik.http.routers.X.tls.certresolver=letsencrypt-http"
# or
- "traefik.http.routers.Y.tls.certresolver=letsencrypt-dns"
Custom Middleware
Rate Limiting:
labels:
  - "traefik.http.middlewares.ratelimit.ratelimit.average=100"
  - "traefik.http.middlewares.ratelimit.ratelimit.burst=50"
  - "traefik.http.routers.X.middlewares=ratelimit"
IP Whitelist:
labels:
  - "traefik.http.middlewares.ipwhitelist.ipwhitelist.sourcerange=192.168.1.0/24,172.16.0.0/16"
  - "traefik.http.routers.X.middlewares=ipwhitelist"
CORS Headers:
labels:
  - "traefik.http.middlewares.cors.headers.accesscontrolallowmethods=GET,OPTIONS,PUT,POST,DELETE"
  - "traefik.http.middlewares.cors.headers.accesscontrolalloworigin=*"
  - "traefik.http.routers.X.middlewares=cors"
Automatic HTTPS Redirect
Already configured in traefik.yml, but you can customize:
entryPoints:
  web:
    address: ":80"
    http:
      redirections:
        entryPoint:
          to: websecure
          scheme: https
          permanent: true # 301 redirect
Custom Default Certificate
If you want a different default certificate:
# In tls-certificates.yml
tls:
  stores:
    default:
      defaultCertificate:
        certFile: /etc/traefik/certs/default/fullchain.pem
        keyFile: /etc/traefik/certs/default/privkey.pem
Additional Resources
Official Documentation
Useful Tools
- htpasswd: Generate password hashes for basic auth
- openssl: Test SSL/TLS certificates
- curl: Test HTTP/HTTPS endpoints
- jq: Parse JSON (for acme.json)
Certificate Authorities
- Let’s Encrypt – Free automated certificates
- Let’s Encrypt Rate Limits
- SSL Labs Server Test – Test your SSL configuration
Quick Command Reference
# Create structure
mkdir -p traefik/{dynamic,certs/wildcard.apps.abc.com,letsencrypt,logs}

# Set permissions
chmod 600 letsencrypt/acme.json

# Create network
docker network create web

# Start Traefik
docker-compose up -d

# View logs
docker logs -f traefik

# Check certificate
echo | openssl s_client -servername DOMAIN -connect IP:443 2>/dev/null | openssl x509 -noout -text

# Restart Traefik
docker-compose restart traefik

# Update Traefik
docker-compose pull && docker-compose up -d

# Backup acme.json
cp letsencrypt/acme.json letsencrypt/acme.json.backup

# Generate auth hash
echo $(htpasswd -nb admin password) | sed -e s/\\$/\\$\\$/g

# View Let's Encrypt certificates
docker exec traefik cat /letsencrypt/acme.json | jq
Summary
This configuration provides a robust solution for managing both static and dynamic certificates in Traefik:
- Static wildcard certificate (
*.apps.abc.com): Manually managed, used for internal applications - Dynamic Let’s Encrypt certificates: Automatically obtained and renewed for customer-facing domains
- Automatic certificate selection: Traefik intelligently chooses the right certificate based on domain and labels
Key Takeaways
- Use
tls=truefor*.apps.abc.comdomains (static wildcard) - Use
tls.certresolver=letsencryptfor other domains (dynamic Let’s Encrypt) - Traefik handles all certificate selection automatically
- Let’s Encrypt certificates are automatically renewed
- Static wildcard certificate must be manually renewed
The Two-Label Rule
Remember this simple rule:
| Domain Type | Label | Certificate |
|---|---|---|
*.apps.abc.com |
tls=true |
Static Wildcard |
| Everything else | tls.certresolver=letsencrypt |
Let’s Encrypt |
Last Updated: January 2025
PFX/PKCS12 Certificate Management Guide
This guide provides comprehensive instructions for managing SSL/TLS certificates in PFX (PKCS12) format, including extraction, verification, and conversion to formats commonly used by web servers like Nginx, Apache, and Traefik.
Prerequisites
- OpenSSL installed on your system
- Access to your PFX file
- Password for the PFX file (if protected)
Understanding PFX Files
What is a PFX file?
PFX (Personal Information Exchange) or PKCS#12 is a binary format that bundles:
- Private Key – Used to decrypt traffic
- Certificate – Your domain/server certificate (leaf certificate)
- Certificate Chain – Intermediate and optionally root CA certificates
Why extract components from PFX?
Many web servers and applications require certificates in PEM format with separate or combined files:
- Nginx: Requires
fullchain.pemandprivkey.pem - Apache: Requires certificate, private key, and chain as separate files
- Traefik: Can use either PFX or PEM formats
- HAProxy: Requires combined certificate + key file
- Docker containers: Often expect PEM format
Common Use Cases
- Setting up SSL/TLS on web servers (Nginx, Apache, Traefik)
- Migrating certificates between different platforms
- Verifying certificate chain completeness before deployment
- Converting Windows-exported certificates to Linux-compatible format
- Troubleshooting SSL certificate issues
Working with PFX Files
Setup Environment
First, set your PFX password as an environment variable for convenience:
export PFX_PASSWORD='your_password_here'
Note: For empty passwords, use: export PFX_PASSWORD=''
Check if PFX Contains Full Chain
Before extracting, verify that your PFX file contains the complete certificate chain.
Method 1: Count Certificates
openssl pkcs12 -in star.yourfile.pfx -nodes -nokeys -passin pass:$PFX_PASSWORD | grep -c "BEGIN CERTIFICATE"
Expected Results:
1= Only your certificate (⚠️ incomplete chain)2= Your certificate + 1 intermediate CA (✅ typical)3+= Your certificate + multiple intermediates (✅ complete chain)
Method 2: Display Certificate Details
openssl pkcs12 -in star.yourfile.pfx -nodes -nokeys -passin pass:$PFX_PASSWORD -info
This command displays:
- All certificates with their subject and issuer
- Certificate validity dates
- Complete certificate chain hierarchy
Extract Components from PFX
Extract Full Certificate Chain (fullchain.pem)
This creates a file containing your certificate and all intermediate certificates.
openssl pkcs12 -in star.yourfile.pfx -out star.yourfile.pem -nodes -nokeys -passin pass:$PFX_PASSWORD
Flags Explained:
-in– Input PFX file-out– Output PEM file-nodes– Don’t encrypt the output (removes passphrase)-nokeys– Export only certificates, not the private key-passin pass:$PFX_PASSWORD– Provide password non-interactively
Output: star.yourfile.pem (fullchain.pem)
Extract Private Key (privkey.pem)
This extracts only the private key from the PFX file.
openssl pkcs12 -in star.yourfile.pfx -out star.yourfile.key -nodes -nocerts -passin pass:$PFX_PASSWORD
Flags Explained:
-nocerts– Export only the private key, not certificates-nodes– Output key without encryption
Output: star.yourfile.key (privkey.pem)
⚠️ Security Warning: Protect this file! Set proper permissions:
chmod 600 star.yourfile.key
Extract Everything in One File
If you need certificate + chain + private key in a single file:
openssl pkcs12 -in star.yourfile.pfx -out combined.pem -nodes -passin pass:$PFX_PASSWORD
Use Case: HAProxy, some load balancers
Verification Methods
1. View Certificate Subjects and Issuers
openssl crl2pkcs7 -nocrl -certfile star.yourfile.pem | openssl pkcs7 -print_certs -noout
What to look for:
- Each certificate’s
subjectshould match the next certificate’sissuer - Forms a chain from your certificate to the root CA
Example Output:
subject=CN=*.example.com
issuer=CN=Intermediate CA

subject=CN=Intermediate CA
issuer=CN=Root CA
2. Verify Certificate Chain Integrity
openssl verify -CAfile star.yourfile.pem star.yourfile.pem
Expected Output:
star.yourfile.pem: OK
If verification fails, your chain is incomplete or corrupted.
3. Check Certificate Expiration
openssl x509 -in star.yourfile.pem -noout -dates
Output:
notBefore=Jan  1 00:00:00 2024 GMT
notAfter=Dec 31 23:59:59 2025 GMT
4. Display Certificate Details
openssl x509 -in star.yourfile.pem -text -noout
Shows complete certificate information including:
- Subject and Issuer
- Validity period
- Subject Alternative Names (SANs)
- Key usage
- Extensions
5. List All Certificates in Chain
openssl storeutl -certs star.yourfile.pem
Displays each certificate in the chain with its details.
Creating Full Chain Certificates
Scenario 1: PFX Missing Intermediate Certificates
If your PFX only contains the leaf certificate, you need to add the chain manually.
Step 1: Extract components
# Extract certificate
openssl pkcs12 -in star.yourfile.pfx -out cert.pem -nodes -nokeys -clcerts -passin pass:$PFX_PASSWORD

# Extract private key
openssl pkcs12 -in star.yourfile.pfx -out privkey.pem -nodes -nocerts -passin pass:$PFX_PASSWORD
Step 2: Obtain intermediate certificates
Download the chain file from your Certificate Authority (CA):
- Let’s Encrypt: Included automatically
- DigiCert, Sectigo, etc.: Available in your CA account
- Or download from: https://www.example-ca.com/chain.pem
Step 3: Combine certificate with chain
cat cert.pem chain.pem > fullchain.pem
Step 4: Create new PFX with complete chain
openssl pkcs12 -export -out newfile.pfx \
  -inkey privkey.pem \
  -in cert.pem \
  -certfile chain.pem \
  -name "*.example.com" \
  -passout pass:$PFX_PASSWORD
Scenario 2: Already Have Separate Files
If you have certificate and chain as separate files:
# Combine certificate and chain
cat star_asb_bh.crt star_asb_bh-chain.pem > fullchain.pem

# Verify the chain
grep -c "BEGIN CERTIFICATE" fullchain.pem
openssl verify -CAfile fullchain.pem fullchain.pem
Optional: Create PFX from separate files:
openssl pkcs12 -export -out newfile.pfx \
  -inkey star_asb_bh.key \
  -in star_asb_bh.crt \
  -certfile star_asb_bh-chain.pem \
  -name "*.asb.bh" \
  -passout pass:$PFX_PASSWORD
Alternative Scenarios
Using with Nginx
Create the required files:
# Full chain certificate
openssl pkcs12 -in star.yourfile.pfx -out /etc/nginx/ssl/fullchain.pem -nodes -nokeys -passin pass:$PFX_PASSWORD

# Private key
openssl pkcs12 -in star.yourfile.pfx -out /etc/nginx/ssl/privkey.pem -nodes -nocerts -passin pass:$PFX_PASSWORD

# Set permissions
chmod 644 /etc/nginx/ssl/fullchain.pem
chmod 600 /etc/nginx/ssl/privkey.pem
Nginx configuration:
server {
    listen 443 ssl;
    server_name example.com;

    ssl_certificate /etc/nginx/ssl/fullchain.pem;
    ssl_certificate_key /etc/nginx/ssl/privkey.pem;
}
Using with Traefik
Option 1: Use PFX directly (if Traefik supports it)
tls:
  stores:
    default:
      defaultCertificate:
        certFile: /path/to/star.yourfile.pfx
Option 2: Convert to PEM format
# Extract both cert and key
openssl pkcs12 -in star.yourfile.pfx -out combined.pem -nodes -passin pass:$PFX_PASSWORD
Traefik configuration:
tls:
  certificates:
    - certFile: /path/to/fullchain.pem
      keyFile: /path/to/privkey.pem
Using with Apache
# Certificate
openssl pkcs12 -in star.yourfile.pfx -out /etc/apache2/ssl/cert.pem -nodes -nokeys -clcerts -passin pass:$PFX_PASSWORD

# Private Key
openssl pkcs12 -in star.yourfile.pfx -out /etc/apache2/ssl/privkey.pem -nodes -nocerts -passin pass:$PFX_PASSWORD

# Chain (intermediate certificates)
openssl pkcs12 -in star.yourfile.pfx -out /etc/apache2/ssl/chain.pem -nodes -nokeys -cacerts -passin pass:$PFX_PASSWORD
Apache configuration:
<VirtualHost *:443>
    SSLEngine on
    SSLCertificateFile /etc/apache2/ssl/cert.pem
    SSLCertificateKeyFile /etc/apache2/ssl/privkey.pem
    SSLCertificateChainFile /etc/apache2/ssl/chain.pem
</VirtualHost>
Troubleshooting
Error: “wrong tag” or “nested asn1 error”
Cause: Corrupted file, wrong format, or legacy encryption
Solutions:
# Try with legacy provider (OpenSSL 3.x)
openssl pkcs12 -in star.yourfile.pfx -nodes -nokeys -legacy -passin pass:$PFX_PASSWORD

# Try with both providers
openssl pkcs12 -in star.yourfile.pfx -nodes -nokeys -provider legacy -provider default -passin pass:$PFX_PASSWORD
Error: File shows all zeros (0x00)
Check file integrity:
hexdump -C star.yourfile.pfx | head -20
Valid PFX should start with: 30 82 or 30 80 or 30 84
If all zeros: File is corrupted. Re-download or re-export from source.
Error: “MAC verification failed”
Cause: Incorrect password
Solution:
- Verify your password
- Try empty password:
export PFX_PASSWORD='' - Re-export the PFX with known password
Certificate Chain Verification Fails
Check the chain order:
openssl storeutl -certs fullchain.pem
Expected order:
- Your domain certificate (leaf)
- Intermediate CA certificate(s)
- Root CA (optional)
Fix incorrect order:
# Manually reorder certificates in a text editor
# Ensure leaf certificate comes first
Missing Intermediate Certificates
Symptoms:
- Browser shows “NET::ERR_CERT_AUTHORITY_INVALID”
- SSL Labs test shows “Chain issues”
grep -c "BEGIN CERTIFICATE"returns only 1
Solution: Download intermediate certificate from your CA and combine:
cat your-cert.pem intermediate.pem > fullchain.pem
Quick Reference Commands
# Set password
export PFX_PASSWORD='your_password'

# Check certificate count
openssl pkcs12 -in file.pfx -nodes -nokeys -passin pass:$PFX_PASSWORD | grep -c "BEGIN CERTIFICATE"

# Extract full chain
openssl pkcs12 -in file.pfx -out fullchain.pem -nodes -nokeys -passin pass:$PFX_PASSWORD

# Extract private key
openssl pkcs12 -in file.pfx -out privkey.pem -nodes -nocerts -passin pass:$PFX_PASSWORD

# Verify chain
openssl verify -CAfile fullchain.pem fullchain.pem

# View certificate details
openssl x509 -in fullchain.pem -text -noout

# Check expiration
openssl x509 -in fullchain.pem -noout -dates

# Create PFX from separate files
openssl pkcs12 -export -out new.pfx -inkey privkey.pem -in cert.pem -certfile chain.pem

# Combine certificate files
cat cert.pem chain.pem > fullchain.pem
Security Best Practices
-
Protect Private Keys
chmod 600 privkey.pem chown root:root privkey.pem -
Never commit certificates to version control
# Add to .gitignore *.pfx *.pem *.key *.crt -
Use strong passwords for PFX files
- Minimum 12 characters
- Mix of letters, numbers, symbols
-
Regularly rotate certificates
- Monitor expiration dates
- Automate renewal where possible
-
Store backups securely
- Encrypted storage
- Access control
- Regular backup verification
Additional Resources
- OpenSSL Documentation
- SSL Labs Server Test
- Let’s Encrypt Documentation
- Mozilla SSL Configuration Generator
License
This documentation is provided as-is for educational and reference purposes.
Last Updated: January 2026
Restoring SQL Server BACPAC Files on Mac M3
Overview
This guide covers how to restore a .bacpac database backup file to SQL Server running in Docker on Mac M3 (Apple Silicon) using SqlPackage.
Prerequisites
- SQL Server running in Docker
.bacpacbackup file- Terminal access
- Docker container running and accessible
Installation Steps
1. Download SqlPackage for macOS
SqlPackage is Microsoft’s command-line utility for importing and exporting SQL Server databases.
# Navigate to Downloads folder
cd ~/Downloads

# Download SqlPackage for macOS (universal binary - works on ARM64/M3)
curl -L -o sqlpackage.zip https://aka.ms/sqlpackage-macos

# Extract the package
unzip sqlpackage.zip -d sqlpackage

# Make the binary executable
chmod +x sqlpackage/sqlpackage
Restoring a BACPAC File
Basic Restore Command
./sqlpackage/sqlpackage /Action:Import \
  /SourceFile:"your-database.bacpac" \
  /TargetServerName:"localhost,PORT" \
  /TargetDatabaseName:"YourDatabaseName" \
  /TargetUser:"sa" \
  /TargetPassword:'YourPassword' \
  /TargetTrustServerCertificate:True
Example Usage
./sqlpackage/sqlpackage /Action:Import \
  /SourceFile:"SampleDatabase.bacpac" \
  /TargetServerName:"localhost,5433" \
  /TargetDatabaseName:"ESOLAut0mater12" \
  /TargetUser:"sa" \
  /TargetPassword:'SecureP@ssword' \
  /TargetTrustServerCertificate:True
Example with Extended Timeout (for large databases)
./sqlpackage/sqlpackage /Action:Import \
  /SourceFile:"SampleDatabase.bacpac" \
  /TargetServerName:"localhost,5433" \
  /TargetDatabaseName:"ESOLAut0mater12" \
  /TargetUser:"sa" \
  /TargetPassword:'SecureP@ssword' \
  /TargetTrustServerCertificate:True \
  /TargetTimeout:600
Important Parameters Explained
| Parameter | Description |
|---|---|
/Action:Import |
Specifies that we’re importing a BACPAC file |
/SourceFile |
Path to your .bacpac file |
/TargetServerName |
Server address with port (format: hostname,port) |
/TargetDatabaseName |
Name for the restored database |
/TargetUser |
SQL Server username (typically sa) |
/TargetPassword |
SQL Server password |
/TargetTrustServerCertificate:True |
Required for Docker SQL Server – trusts self-signed certificates |
/TargetTimeout:600 |
Optional – Connection timeout in seconds (use for large databases) |
Common Issues and Solutions
1. SSL Certificate Error
Error: The remote certificate was rejected by the provided RemoteCertificateValidationCallback
Solution: Add /TargetTrustServerCertificate:True parameter (already included in the example above)
2. Password with Special Characters
If your password contains special characters like !, @, #, etc., wrap it in single quotes:
/TargetPassword:'SecureP@ssword'
3. Connection Format
- ✅ Correct:
localhost,5433(comma separator) - ❌ Incorrect:
localhost;5433(semicolon separator) - ❌ Incorrect:
localhost:5433(colon separator)
4. Port Numbers
Common SQL Server ports:
- Default:
1433 - Custom Docker:
5433(or whatever you mapped in your Docker run command)
Find your Docker port mapping:
docker ps
# Look for something like: 0.0.0.0:5433->1433/tcp
5. Transport-Level Errors with Large Tables
Error: A transport-level error has occurred when receiving results from the server
Symptoms:
- Import fails consistently at the same tables (often audit or log tables)
- Error message:
Transport-level errororInvalid argument - Import works up to a certain point, then crashes
Root Cause:
Some tables (like AbpAuditLogs, AbpEntityChanges, AbpEntityPropertyChanges) can contain massive amounts of data that cause timeout or memory issues during bulk import on Mac M3 with Docker SQL Server.
Solution: Manually Remove Large Table Data from BACPAC
Since BACPAC is essentially a ZIP file, you can extract it, remove problematic table data, and re-package it.
Step-by-Step Process
# Navigate to your BACPAC location
cd ~/Downloads

# Remove previous folders if they exist
rm -rf ESOLAut0mater_Modified.bacpac
rm -rf bacpac_extracted

# Unzip the BACPAC
unzip YourDatabase.bacpac -d bacpac_extracted

# Navigate to the Data folder
cd bacpac_extracted/Data

# Remove the large table data files (BCP files contain the actual data)
# Common problematic tables (adjust based on your error messages):
rm -rf dbo.AbpAuditLogs/*.BCP
rm -rf dbo.AbpEntityChanges/*.BCP
rm -rf dbo.AbpEntityPropertyChanges/*.BCP

# Add more tables if needed:
# rm -rf dbo.YourLargeTable/*.BCP

# Return to parent directory and re-zip
cd ..
zip -r ../YourDatabase_Modified.bacpac *

# Go back to Downloads folder
cd ..

# Import the modified BACPAC
./sqlpackage/sqlpackage /Action:Import \
  /SourceFile:"YourDatabase_Modified.bacpac" \
  /TargetServerName:"localhost,5433" \
  /TargetDatabaseName:"YourDatabaseName" \
  /TargetUser:"sa" \
  /TargetPassword:'YourPassword' \
  /TargetTrustServerCertificate:True \
  /TargetTimeout:600
Complete Example
cd ~/Downloads

# Clean up previous attempts
rm -rf ESOLAut0mater_Modified.bacpac
rm -rf bacpac_extracted

# Unzip the BACPAC
unzip SampleDatabase.bacpac -d bacpac_extracted

# Remove problematic table data
cd bacpac_extracted/Data
rm -rf dbo.AbpAuditLogs/*.BCP
rm -rf dbo.AbpEntityChanges/*.BCP
rm -rf dbo.AbpEntityPropertyChanges/*.BCP

# Re-zip it
cd ..
zip -r ../ESOLAut0mater_Modified.bacpac *

# Import the modified BACPAC
cd ..
./sqlpackage/sqlpackage /Action:Import \
  /SourceFile:"ESOLAut0mater_Modified.bacpac" \
  /TargetServerName:"localhost,5433" \
  /TargetDatabaseName:"ESOLAut0mater12" \
  /TargetUser:"sa" \
  /TargetPassword:'SecureP@ssword' \
  /TargetTrustServerCertificate:True \
  /TargetTimeout:600
How to Identify Problematic Tables
-
Look at the import output – it shows which table was processing when it failed:
Processing Table '[dbo].[AbpAuditLogs]'. *** A transport-level error has occurred... -
Check the Data folder structure in the extracted BACPAC:
cd bacpac_extracted/Data
du -sh */ | sort -h
# This shows folder sizes - large folders are likely culprits
Important Notes
- Schema Preservation: This method only removes table DATA, not the table structure. The tables will exist but will be empty.
- Foreign Keys: If other tables reference the data you’re removing, you may need to handle those dependencies.
- Audit Tables: Tables like
AbpAuditLogs,AbpEntityChanges,AbpEntityPropertyChangesare typically audit/log tables and are safe to empty for development environments. - Production Warning: Do not use this method for production imports where you need complete data integrity.
- Alternative: If you need the data from these tables, consider using Azure Data Studio which sometimes handles large imports better, or increase Docker memory allocation significantly (8GB+).
Verify After Import
After importing the modified BACPAC, verify your data:
USE YourDatabaseName;
GO

-- Check table count
SELECT COUNT(*) AS TotalTables FROM sys.tables;

-- Check row counts for all tables
SELECT
    SCHEMA_NAME(t.schema_id) + '.' + t.name AS TableName,
    SUM(p.rows) AS RowCount
FROM sys.tables t
INNER JOIN sys.partitions p ON t.object_id = p.object_id
WHERE p.index_id IN (0, 1)
GROUP BY t.schema_id, t.name
ORDER BY RowCount DESC;

-- Verify important business tables have data
SELECT COUNT(*) FROM [YourSchema].[YourImportantTable];
Optional: Install Globally
To use SqlPackage from any directory:
# Move to permanent location
sudo mkdir -p /usr/local/sqlpackage
sudo cp -r sqlpackage/* /usr/local/sqlpackage/

# Create symbolic link
sudo ln -s /usr/local/sqlpackage/sqlpackage /usr/local/bin/sqlpackage

# Now you can run from anywhere
sqlpackage /Action:Import \
  /SourceFile:"~/path/to/database.bacpac" \
  /TargetServerName:"localhost,5433" \
  /TargetDatabaseName:"DatabaseName" \
  /TargetUser:"sa" \
  /TargetPassword:'YourPassword' \
  /TargetTrustServerCertificate:True
Verifying the Restore
After successful import, verify the database using VS Code with mssql extension or any SQL client:
-- List all databases
SELECT name FROM sys.databases;

-- Check table count in restored database
USE YourDatabaseName;
SELECT COUNT(*) AS TableCount
FROM INFORMATION_SCHEMA.TABLES
WHERE TABLE_TYPE = 'BASE TABLE';
Alternative Tools
If SqlPackage doesn’t work for your use case:
-
Azure Data Studio (Recommended GUI option)
brew install --cask azure-data-studio- Right-click “Databases” → “Import Data-tier Application”
- Browse to your
.bacpacfile
-
Direct Docker approach (if SqlPackage is available in container)
docker cp database.bacpac container_name:/tmp/
docker exec -it container_name /path/to/sqlpackage /Action:Import ...
Additional SqlPackage Actions
SqlPackage supports other database operations:
# Export database to BACPAC
./sqlpackage/sqlpackage /Action:Export \
  /SourceServerName:"localhost,5433" \
  /SourceDatabaseName:"DatabaseName" \
  /SourceUser:"sa" \
  /SourcePassword:'Password' \
  /TargetFile:"output.bacpac" \
  /SourceTrustServerCertificate:True

# Extract to DACPAC (schema only)
./sqlpackage/sqlpackage /Action:Extract \
  /SourceServerName:"localhost,5433" \
  /SourceDatabaseName:"DatabaseName" \
  /SourceUser:"sa" \
  /SourcePassword:'Password' \
  /TargetFile:"schema.dacpac" \
  /SourceTrustServerCertificate:True
Resources
Notes
- BACPAC files contain both schema and data
- DACPAC files contain only schema (no data)
- SqlPackage on Mac M3 runs natively on ARM64 architecture
- Self-signed certificates in Docker SQL Server require the
TrustServerCertificateparameter - For production environments, consider using proper SSL certificates
- Large Tables: If import fails with transport-level errors on specific tables (especially audit/log tables), you can manually remove their data from the BACPAC by unzipping it, deleting the problematic
.BCPfiles, and re-zipping (see section 5 in Common Issues) - Docker Resources: For large database imports, ensure Docker has sufficient resources allocated (4GB+ RAM, 2+ CPU cores)
- Development vs Production: The manual BACPAC modification method is suitable for development environments where audit history is not critical
🚀 Installing Odoo 16/17/18 on a Free Cloud Server (AWS Lightsail, DigitalOcean, etc.)
🔹 Scenario
If you need to install Odoo 16, 17, or 18 on a free cloud server like AWS Lightsail, DigitalOcean Droplets, or similar, this guide will help you set up an Odoo instance at zero cost. This setup is perfect for testing functionalities, running demos, or short-term development.
🛠 Supported Versions
- Odoo Versions: 16, 17, 18, 19 (tested)
- Ubuntu Version: 24.04 LTS
✅ Step-by-Step Installation Guide
1️⃣ Create a Free Ubuntu 24.04 Server
- Sign up for AWS Lightsail and create a 90-day free Ubuntu 24.04 instance.
- Choose a basic server configuration (e.g., 1GB RAM, 1vCPU, 20GB SSD).
2️⃣ Apply the Launch Script
During the instance creation process, paste the following launch script in the “Launch Script” section:
https://github.com/princeppy/odoo-install-scripts/blob/main/lightsail.aws/launch_script.sh
This script automates the initial setup, including system updates, package installations, and preparing the Odoo environment.
3️⃣ Access the Server via Browser-Based SSH
Once your instance is up and running:
- Open AWS Lightsail and select your instance.
- Click “Connect using SSH” to access the terminal.
4️⃣ Monitor Installation Progress
Run the following command to track installation logs in real time:
tail -f /tmp/launchscript.log
• Wait until you see:
Preinstallation Completed........
This indicates that the server setup is complete.
5️⃣ Elevate to Root User
Once the installation completes, switch to the root user to run administrative commands:
sudo su
6️⃣ Run the Odoo Installation Script
Now, execute the Odoo installation script:
bash /InstallScript/install_odoo.sh
• The script will download, install, and configure Odoo on your server. • Once completed, look for the confirmation message:
Done
• Your Odoo instance is now ready to use! 🎉
📌 References & Additional Resources
For further reading and alternative installation scripts, check out these resources: • Odoo Install Script by Yenthe666 • Odoo Install Script by Moaaz • Odoo Install Script by Ventor Tech
🚀 Conclusion
By following this guide, you can quickly deploy Odoo 16/17/18/19 on a free Ubuntu 24.04 server using AWS Lightsail or similar platforms. This setup allows you to test Odoo functionalities, run demos, or perform short-term development—all without any cost.
💡 Got questions or need help? Drop a comment below! 🚀