PowerSchool API Postman Collection
 PowerSchool API Postman Collection, feel free to copy to fork it
Overview
This collection provides a complete, production-ready setup for working with PowerSchool APIs. It implements automatic OAuth authentication with token validation, eliminating manual token management and enabling seamless multi-environment workflows.
Key Features
🔐 Automatic Authentication
- Zero Manual Token Management: Tokens are obtained and validated automatically before every request
- Smart Token Validation: Validates tokens against the PowerSchool metadata endpoint (
/ws/v1/metadata) - Auto-Refresh on Expiry: Automatically refreshes expired or invalid tokens
- Bearer Token Headers: All requests automatically include properly formatted
Authorization: Bearer {{psAuthToken}}headers
🌍 Multi-Environment Support
- Different PowerSchool Instances: Easily switch between multiple PowerSchool servers (Development, Staging, Production)
- Credential Isolation: Each environment has its own
psURL,psClientID, andpsClientSecret - Shared Token Storage:
psAuthTokenstored at collection level, shared across all environments - One-Click Switching: Select different environments from Postman dropdown
✅ Token Validation
- Metadata Endpoint Check: Validates token by calling
/ws/v1/metadata - Plugin ID Detection: Confirms token validity by checking for
plugin_idin response - Automatic Recovery: If token is invalid, automatically obtains a new one
- Error Prevention: Detects authentication issues before they cause request failures
📋 Complete Request Examples
- PowerSchool OAuth Request: Direct OAuth endpoint for manual token retrieval
- Get Metadata (with token): Example of authenticated request
- Get Metadata (without token): Shows public metadata access
- Get Students By District: Production-ready example with auto-auth
How It Works
Request Flow
When you click Send on any request:
1. Collection Pre-request Script Runs
   ↓
2. Check: Does psAuthToken exist?
   ├─ NO  → Obtain new token via OAuth
   ├─ YES → Validate token via /ws/v1/metadata
   │        ├─ Valid (has plugin_id) → Proceed
   │        └─ Invalid (no plugin_id) → Get new token
   ↓
3. Token stored in psAuthToken (collection variable)
   ↓
4. Request executes with Authorization: Bearer {{psAuthToken}}
   ↓
5. Response received
Token Validation Logic
Valid Token Response:
{
    "metadata": {
        "plugin_id": 15334,
        "powerschool_version": "25.7.0.1.252121950",
        ...
    }
}
Invalid Token Response:
{
    "metadata": {
        "district_timezone": "Asia/Riyadh",
        ...
        (NO plugin_id field)
    }
}
The script detects missing plugin_id and automatically refreshes the token.
Setup Instructions
1. Create Environments
For each PowerSchool instance, create an environment with:
| Variable | Value |
|---|---|
psURL | https://your-powerschool-domain.com |
psClientID | Your OAuth client ID |
psClientSecret | Your OAuth client secret |
2. Collection Variables
The collection already includes:
psAuthToken– Auto-populated by OAuth script (do not edit)
3. Select Environment
Before making requests, select your environment from the Postman dropdown (top-right).
4. Make Requests
Click Send on any request. The collection pre-request script handles all authentication automatically.
Collection Structure
PowerSchool API Postman Collection
├── Authentication (Collection-level Pre-request Script)
│   ├── Token validation against /ws/v1/metadata
│   ├── Auto-refresh on expiry
│   └── Error handling
│
├── PowerSchool OAuth Request (POST)
│   └── Direct OAuth endpoint access
│   └── Manual token retrieval (for testing)
│
├── Get Metadata (with token) (GET)
│   └── Authenticated metadata endpoint
│   └── Shows valid token usage
│
├── Get Metadata (without token) (GET)
│   └── Public metadata access
│   └── Shows response without authentication
│
└── Get Students By District (GET)
    └── Example authenticated API request
    └── Returns district student data
Variables Reference
Collection Variables
psAuthToken– OAuth access token (auto-populated, do NOT manually edit)
Environment Variables (Set per PowerSchool instance)
psURL– PowerSchool domain (e.g.,https://ps.asb.bh)psClientID– OAuth client ID from PowerSchool adminpsClientSecret– OAuth client secret from PowerSchool admin
Console Logging
The collection provides detailed console logging for debugging:
Successful Token Validation:
⚠ Validating existing token...
✓ Token is valid. Plugin ID: 15334
✓ Auth token already set, proceeding...
Token Refresh:
⚠ Validating existing token...
⚠ Token is invalid. No plugin_id in metadata response
⚠ Token is invalid, getting new one...
⚠ Getting new authentication token...
✓ New token obtained successfully
Missing Credentials:
✗ Missing required variables: psURL, psClientID, or psClientSecret
Open Postman Console (bottom-left) to view all logs.
Common Use Cases
Adding New PowerSchool API Endpoints
- Click “+” to add new request to collection
- Set method and URL:
{{psURL}}/ws/v1/[endpoint] - Add headers:
Authorization: Bearer {{psAuthToken}}Accept: application/json
- Click Save
The collection pre-request script automatically handles authentication for all new requests.
Switching Between PowerSchool Instances
- Open Postman
- Click environment dropdown (top-right)
- Select desired environment
- Make request – collection script uses selected environment’s credentials
Manual OAuth Testing
- Click PowerSchool OAuth Request
- Verify environment is selected
- Click Send
- Token is extracted and stored in
psAuthToken - Check console for success/error messages
Validating Token Status
- Click Get Metadata (with token)
- Click Send
- Response shows current metadata with or without
plugin_id - If
plugin_idis present, token is valid - If
plugin_idis missing, token will auto-refresh on next request
Error Handling
“Missing required variables”
Cause: Environment variables not set
Solution: Add psURL, psClientID, psClientSecret to selected environment
“OAuth request failed with status 401”
Cause: Incorrect credentials Solution: Verify OAuth client ID and secret in PowerSchool admin portal
“Token is invalid. No plugin_id in metadata response”
Cause: Token lacks required permissions or is expired Solution: Token auto-refreshes automatically on next request
“Authorization header empty”
Cause: Token didn’t load before request executed Solution: Wait a moment and retry, or manually run OAuth request first
Best Practices
Security
- ✓ Never commit real credentials to version control
- ✓ Use Postman environments to store sensitive data
- ✓ Treat
psClientSecretlike a password - ✓ Rotate OAuth credentials periodically
Organization
- ✓ Use meaningful request names
- ✓ Group related endpoints in folders
- ✓ Document expected responses in request descriptions
- ✓ Keep collection pre-request script clean and updated
Maintenance
- ✓ Test collection monthly with all environments
- ✓ Monitor PowerSchool API changes
- ✓ Update endpoints as PowerSchool APIs evolve
- ✓ Keep OAuth credentials current
API Endpoints Included
| Endpoint | Method | Purpose |
|---|---|---|
/oauth/access_token | POST | OAuth token retrieval |
/ws/v1/metadata | GET | System metadata (with & without token) |
/ws/v1/district | GET | District information |
Next Steps
- Create Environments: Add your PowerSchool instances as separate environments
- Set Credentials: Configure
psURL,psClientID,psClientSecretper environment - Test Collection: Run requests and verify token validation in console
- Extend Collection: Add more endpoints as needed using the same patterns
Support & Troubleshooting
Check Console Logs
Open Postman Console (bottom of screen) to see detailed execution logs including:
- Token validation results
- OAuth request status
- Variable resolution
- Error messages
Validate Token Manually
- Run Get Metadata (with token)
- Look for
"plugin_id"in response - If present: Token is valid ✓
- If missing: Token needs refresh (auto-handled)
Test OAuth Endpoint
- Run PowerSchool OAuth Request
- Check console for:
✓ Set psAuthToken as [token]– Success✗ OAuth failed...– Check credentials
FAQ
Q: Do I need to manually get a token? A: No. The collection automatically manages tokens. Manual OAuth request is only for testing.
Q: Can I use this with multiple PowerSchool instances? A: Yes. Create separate environments for each instance and switch between them.
Q: What happens if my token expires? A: The collection automatically detects expiry and refreshes the token before the next request.
Q: Where is my token stored?
A: In the collection variable psAuthToken. It persists across environment switches.
Q: Can I see what the script is doing? A: Yes. Open Postman Console (Ctrl+Alt+C or Cmd+Option+C) to view detailed logs.
Q: How often do tokens refresh? A: Only when they expire or are invalid. Valid tokens are reused across requests.
Author: Prince PARK
Version: 1.0
Last Updated: March 26, 2026
Created For: PowerSchool API Integration
Requires: Postman 10.0+
Claude Code commands `sync-claude-md`
Setup a global Claude Code slash command that diffs your unstaged changes and untracked files and auto-updates `CLAUDE.md`.
How global slash commands work
Claude Code looks for custom commands in ~/.claude/commands/. Each .md file becomes a /command-name you can invoke from any project.
Step 1 — Create the global commands directory
mkdir -p ~/.claude/commands
Step 2 — Create the command file
cat > ~/.claude/commands/sync-claude-md.md << 'EOF'
# Sync CLAUDE.md from unstaged changes

You are a senior engineer maintaining a living CLAUDE.md for this project.
Your job is to analyze what has changed in the working tree and surgically update CLAUDE.md to reflect those changes — without rewriting sections that are still accurate.

## Phase 1 — Capture the diff

Run the following commands and carefully read every line of output:

```bash
git diff
```

```bash
git diff --stat
```

```bash
git status --short
```

Also read any new untracked files that are relevant to project structure:

```bash
git ls-files --others --exclude-standard
```

## Phase 2 — Read current CLAUDE.md

Read the existing CLAUDE.md in full so you know what is already documented and what needs updating.

## Phase 3 — Analyze the diff

For every changed file, determine:

- Was a new dependency added or removed? (\*.csproj changes)
- Was the architecture changed? (new folder, new project, new layer)
- Were commands changed? (Program.cs, launchSettings.json, Makefile, tasks.json)
- Were new environment variables or config keys introduced? (appsettings\*.json)
- Was the database schema or migration strategy changed? (DbContext, Migrations/)
- Were new API routes or controllers added? (Controllers/)
- Were code conventions changed? (.editorconfig, .globalconfig, Directory.Build.props)
- Were tests added that reveal new patterns? (_Tests_/)
- Was anything removed that CLAUDE.md still documents?

## Phase 4 — Update CLAUDE.md surgically

Rules:

- ONLY edit sections that are directly affected by the diff
- Do NOT rewrite or reformat sections that are still accurate
- If a new section is needed, add it — do not skip it
- If a section is now outdated, update it with the accurate information
- If something was deleted from the codebase, remove it from CLAUDE.md
- Preserve the existing structure and tone
- Every command you write must be one you verified actually exists in this repo

After saving CLAUDE.md, print a concise changelog of exactly what you changed and why, in this format:

**CLAUDE.md Update Summary**

- [Section name]: [what changed and why]
- [Section name]: [what changed and why]
EOF
Step 3 — Verify it’s available
ls ~/.claude/commands/
# should show: sync-claude-md.md
Step 4 — Use it from any project
Open Claude Code in your project terminal and run:
/sync-claude-md
Claude will immediately run the three git commands, read the diff, compare against your current CLAUDE.md, and surgically update only the affected sections.
Optional — Add a faster alias for the diff-only audit
If you also want a lightweight read-only version that reports what’s stale without editing, add a second command:
cat > ~/.claude/commands/audit-claude-md.md << 'EOF'
# Audit CLAUDE.md against unstaged changes

Run these commands and read the output fully:

```bash
git diff
git diff --stat
git status --short
git ls-files --others --exclude-standard
```

Then read the current CLAUDE.md in full.

Compare the diff against CLAUDE.md and produce a gap report in this format:

**CLAUDE.md Gap Report**

| Section       | Status      | Issue                                                            |
| ------------- | ----------- | ---------------------------------------------------------------- |
| Tech Stack    | ⚠️ Stale    | Package X was removed in csproj but still listed                  |
| Commands      | ✅ Accurate | No changes                                                        |
| Configuration | ⚠️ Missing  | New key `Feature:FlagName` added in appsettings.Development.json  |

After the table, list your recommended edits in priority order.
Do NOT modify any files — this is a read-only audit.
EOF
Then use it as:
/audit-claude-md
Final directory structure
~/.claude/
└── commands/
├── sync-claude-md.md ← edits CLAUDE.md automatically
└── audit-claude-md.md ← read-only gap report
Both commands are global and will work in any project that has a CLAUDE.md and a git repo — including your ASP.NET Core project and any future ones.
🚀 Installing Odoo 16/17/18 on a Free Cloud Server (AWS Lightsail, DigitalOcean, etc.)
🔹 Scenario
If you need to install Odoo 16, 17, or 18 on a free cloud server like AWS Lightsail, DigitalOcean Droplets, or similar, this guide will help you set up an Odoo instance at zero cost. This setup is perfect for testing functionalities, running demos, or short-term development.
🛠 Supported Versions
- Odoo Versions: 16, 17, 18, 19 (tested)
- Ubuntu Version: 24.04 LTS
✅ Step-by-Step Installation Guide
1️⃣ Create a Free Ubuntu 24.04 Server
- Sign up for AWS Lightsail and create a 90-day free Ubuntu 24.04 instance.
- Choose a basic server configuration (e.g., 1GB RAM, 1vCPU, 20GB SSD).
2️⃣ Apply the Launch Script
During the instance creation process, paste the following launch script in the “Launch Script” section:
https://github.com/princeppy/odoo-install-scripts/blob/main/lightsail.aws/launch_script.sh
This script automates the initial setup, including system updates, package installations, and preparing the Odoo environment.
3️⃣ Access the Server via Browser-Based SSH
Once your instance is up and running:
- Open AWS Lightsail and select your instance.
- Click “Connect using SSH” to access the terminal.
4️⃣ Monitor Installation Progress
Run the following command to track installation logs in real time:
tail -f /tmp/launchscript.log
• Wait until you see:
Preinstallation Completed........
This indicates that the server setup is complete.
5️⃣ Elevate to Root User
Once the installation completes, switch to the root user to run administrative commands:
sudo su
6️⃣ Run the Odoo Installation Script
Now, execute the Odoo installation script:
bash /InstallScript/install_odoo.sh
• The script will download, install, and configure Odoo on your server. • Once completed, look for the confirmation message:
Done
• Your Odoo instance is now ready to use! 🎉
📌 References & Additional Resources
For further reading and alternative installation scripts, check out these resources: • Odoo Install Script by Yenthe666 • Odoo Install Script by Moaaz • Odoo Install Script by Ventor Tech
🚀 Conclusion
By following this guide, you can quickly deploy Odoo 16/17/18/19 on a free Ubuntu 24.04 server using AWS Lightsail or similar platforms. This setup allows you to test Odoo functionalities, run demos, or perform short-term development—all without any cost.
💡 Got questions or need help? Drop a comment below! 🚀
Data Scientist With Microsoft
https://learn.microsoft.com/en-us/users/princeparkyohannanhotmail-8262/transcript/dlmplcnz8w96op1
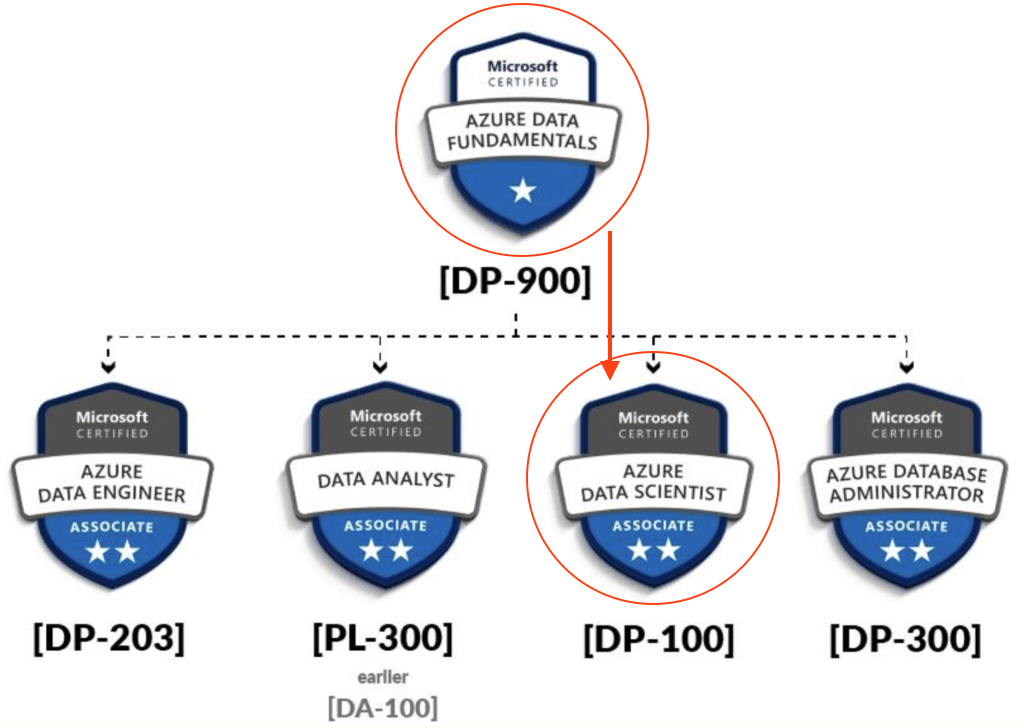
ASSOCIATE CERTIFICATION: Microsoft Certified: Azure Data Scientist Associate
CERTIFICATION EXAM: Designing and Implementing a Data Science Solution on Azure (Exam DP-100)
Data Scientist Career Path
- Learning Paths: Create machine learning models
- Option 1: Foundations of data science for machine learning (complete course)
- Module: Introduction to machine learning
- Module: Build classical machine learning models with supervised learning
- Module: Introduction to data for machine learning
- Module: Explore and analyze data with Python
- Module: Train and understand regression models in machine learning
- Module: Refine and test machine learning models
- Module: Train and evaluate regression models
- Module: Create and understand classification models in machine learning
- Module: Select and customize architectures and hyperparameters using random forest
- Module: Confusion matrix and data imbalances
- Module: Measure and optimize model performance with ROC and AUC
- Module: Train and evaluate classification models
- Module: Train and evaluate clustering models
- Module: Train and evaluate deep learning models
- Option 2: The Understand data science for machine learning (selected modules from option 1)
- Module: Introduction to machine learning
- Module: Build classical machine learning models with supervised learning
- Module: Introduction to data for machine learning
- Module: Train and understand regression models in machine learning
- Module: Refine and test machine learning models
- Module: Create and understand classification models in machine learning
- Module: Select and customize architectures and hyperparameters using random forest
- Module: Confusion matrix and data imbalances
- Module: Measure and optimize model performance with ROC and AUC
- Option 3: The Create machine learning models (selected modules from option 1)
- Option 1: Foundations of data science for machine learning (complete course)
- Learning Paths: Microsoft Azure AI Fundamentals: Explore visual tools for machine learning
- Learning Paths: Build and operate machine learning solutions with Azure Machine Learning
- Learning Paths: Build and operate machine learning solutions with Azure Databricks
COURSES
DP-090T00: Implementing a Machine Learning Solution with Microsoft Azure Databricks – Training
Azure Databricks is a cloud-scale platform for data analytics and machine learning. In this course, you’ll learn how to use Azure Databricks to explore, prepare, and model data; and integrate Databricks machine learning processes with Azure Machine Learning.
- Module: Get started with Azure Databricks
- Module: Work with data in Azure Databricks
- Module: Prepare data for machine learning with Azure Databricks
- Module: Train a machine learning model with Azure Databricks
- Module: Use MLflow to track experiments in Azure Databricks
- Module: Manage machine learning models in Azure Databricks
- Module: Track Azure Databricks experiments in Azure Machine Learning
- Module: Deploy Azure Databricks models in Azure Machine Learning
DP-100T01: Designing and Implementing a Data Science Solution on Azure
This course teaches you to leverage your existing knowledge of Python and machine learning to manage data ingestion and preparation, model training and deployment, and machine learning solution monitoring with Azure Machine Learning and MLflow.
- Module: Design a data ingestion strategy for machine learning projects
- Module: Design a machine learning model training solution
- Module: Design a model deployment solution
- Module: Explore Azure Machine Learning workspace resources and assets
- Module: Explore developer tools for workspace interaction
- Module: Make data available in Azure Machine Learning
- Module: Work with compute targets in Azure Machine Learning
- Module: Work with environments in Azure Machine Learning
- Module: Find the best classification model with Automated Machine Learning
- Module: Track model training in Jupyter notebooks with MLflow
- Module: Run a training script as a command job in Azure Machine Learning
- Module: Track model training with MLflow in jobs
- Module: Run pipelines in Azure Machine Learning
- Module: Perform hyperparameter tuning with Azure Machine Learning
- Module: Deploy a model to a managed online endpoint
- Module: Deploy a model to a batch endpoint
My Learnings.
# Calculate the number of empty cells in each column
# The following line consists of three commands. Try
# to think about how they work together to calculate
# the number of missing entries per column
missing_data = dataset.isnull().sum().to_frame()

# Rename column holding the sums
missing_data = missing_data.rename(columns={0:'Empty Cells'})

# Print the results
print(missing_data)

## OR
print(dataset.isnull().sum().to_frame().rename(columns={0:'Empty Cells'}))

# Show the missing value rows
dataset[dataset.isnull().any(axis=1)]
EDA
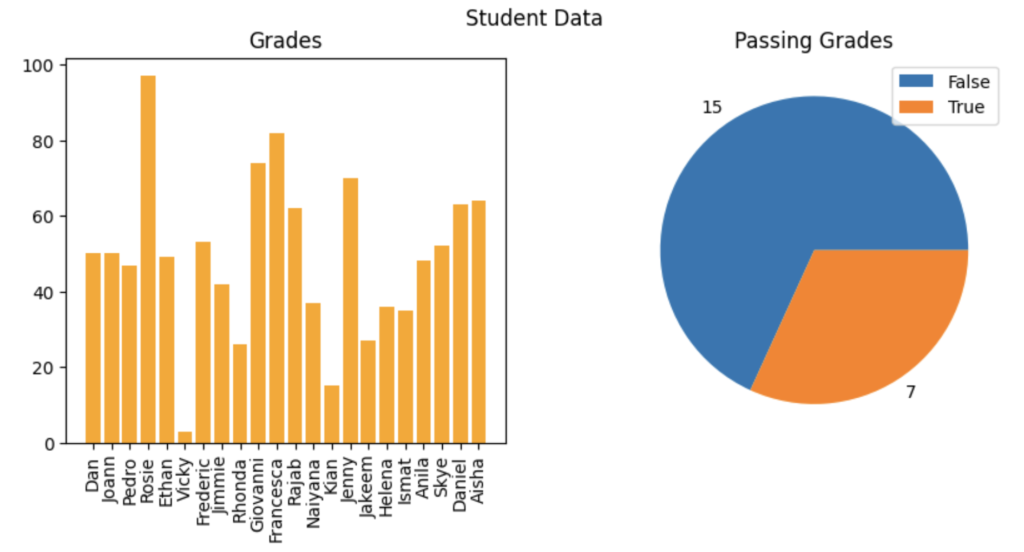
import pandas as pd

# Load data from a text file
!wget https://raw.githubusercontent.com/MicrosoftDocs/mslearn-introduction-to-machine-learning/main/Data/ml-basics/grades.csv
df_students = pd.read_csv('grades.csv',delimiter=',',header='infer')

# Remove any rows with missing data
df_students = df_students.dropna(axis=0, how='any')

# Calculate who passed, assuming '60' is the grade needed to pass
passes  = pd.Series(df_students['Grade'] >= 60)

# Save who passed to the Pandas dataframe
df_students = pd.concat([df_students, passes.rename("Pass")], axis=1)

# Create a figure for 2 subplots (1 row, 2 columns)
fig, ax = plt.subplots(1, 2, figsize = (10,4))

# Create a bar plot of name vs grade on the first axis
ax[0].bar(x=df_students.Name, height=df_students.Grade, color='orange')
ax[0].set_title('Grades')
ax[0].set_xticklabels(df_students.Name, rotation=90)

# Create a pie chart of pass counts on the second axis
pass_counts = df_students['Pass'].value_counts()
ax[1].pie(pass_counts, labels=pass_counts)
ax[1].set_title('Passing Grades')
ax[1].legend(pass_counts.keys().tolist())

# Add a title to the Figure
fig.suptitle('Student Data')

# Show the figure
fig.show()
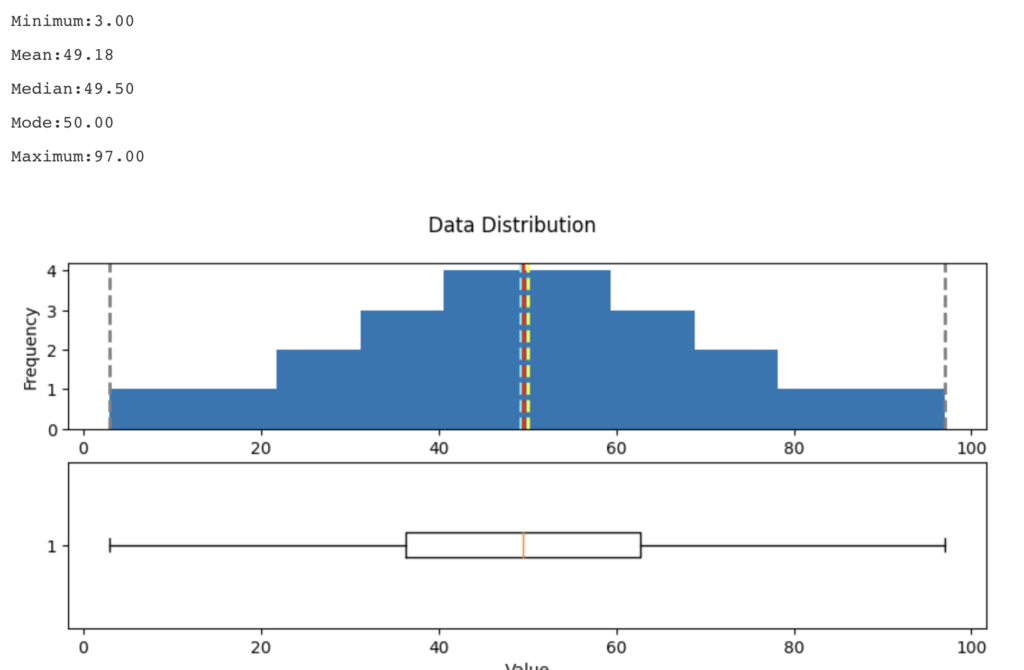
# Create a function that we can re-use
# Create a function that we can re-use
def show_distribution_with_quantile(var_data, quantile = 0):
    '''
    This function will make a distribution (graph) and display it
    '''

    if(quantile > 0){
        # calculate the quantile percentile
        q01 = var_data.quantile(quantile)
        print(f"quantile = {q01}")

        var_data = var_data[var_data>q01]
    }

    # Get statistics
    min_val = var_data.min()
    max_val = var_data.max()
    mean_val = var_data.mean()
    med_val = var_data.median()
    mod_val = var_data.mode()[0]

    print('Minimum:{:.2f}\nMean:{:.2f}\nMedian:{:.2f}\nMode:{:.2f}\nMaximum:{:.2f}\n'.format(min_val,
                                                                                            mean_val,
                                                                                            med_val,
                                                                                            mod_val,
                                                                                            max_val))

    # Create a figure for 2 subplots (2 rows, 1 column)
    fig, ax = plt.subplots(2, 1, figsize = (10,4))

    # Plot the histogram
    ax[0].hist(var_data)
    ax[0].set_ylabel('Frequency')

    # Add lines for the mean, median, and mode
    ax[0].axvline(x=min_val, color = 'gray', linestyle='dashed', linewidth = 2)
    ax[0].axvline(x=mean_val, color = 'cyan', linestyle='dashed', linewidth = 2)
    ax[0].axvline(x=med_val, color = 'red', linestyle='dashed', linewidth = 2)
    ax[0].axvline(x=mod_val, color = 'yellow', linestyle='dashed', linewidth = 2)
    ax[0].axvline(x=max_val, color = 'gray', linestyle='dashed', linewidth = 2)

    # Plot the boxplot
    ax[1].boxplot(var_data, vert=False)
    ax[1].set_xlabel('Value')

    # Add a title to the Figure
    fig.suptitle('Data Distribution')

    # Show the figure
    fig.show()

# Get the variable to examine
col = df_students['Grade']
# Call the function
show_distribution(col)
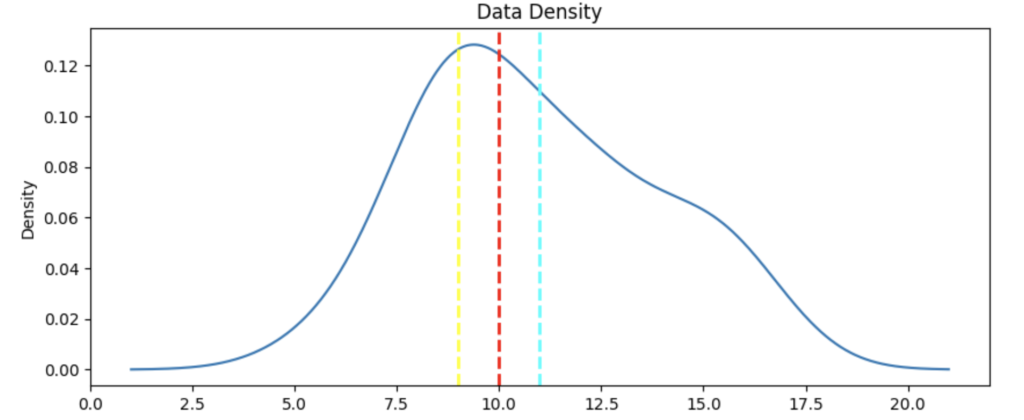
def show_density(var_data):
    fig = plt.figure(figsize=(10,4))

    # Plot density
    var_data.plot.density()

    # Add titles and labels
    plt.title('Data Density')

    # Show the mean, median, and mode
    plt.axvline(x=var_data.mean(), color = 'cyan', linestyle='dashed', linewidth = 2)
    plt.axvline(x=var_data.median(), color = 'red', linestyle='dashed', linewidth = 2)
    plt.axvline(x=var_data.mode()[0], color = 'yellow', linestyle='dashed', linewidth = 2)

    # Show the figure
    plt.show()

# Get the density of StudyHours
show_density(col)
Azure Databricks
Mount a remote Azure storage account as a DBFS folder, using the dbutils module:
data_storage_account_name = '<data_storage_account_name>'
data_storage_account_key = '<data_storage_account_key>'

data_mount_point = '/mnt/data'

data_file_path = '/bronze/wwi-factsale.csv'

dbutils.fs.mount(
  source = f"wasbs://dev@{data_storage_account_name}.blob.core.windows.net",
  mount_point = data_mount_point,
  extra_configs = {f"fs.azure.account.key.{data_storage_account_name}.blob.core.windows.net": data_storage_account_key})

display(dbutils.fs.ls("/mnt/data"))
#this path is available as dbfs:/mnt/data for spark APIs, e.g. spark.read
#this path is available as file:/dbfs/mnt/data for regular APIs, e.g. os.listdir

# %fs magic command - for accessing the dbutils filesystem module. Most dbutils.fs commands are available using %fs magic commands
We can override the cell’s default programming language by using one of the following magic commands at the start of the cell:
%python– for cells running python code%scala– for cells running scala code%r– for cells running R code%sql– for cells running sql code
Additional magic commands are available:
%md– for descriptive cells using markdown%sh– for cells running shell commands%run– for cells running code defined in a separate notebook%fs– for cells running code that usesdbutilscommands
Best Tutorials
Python
39 of the best JavaScript libraries and frameworks to try in 2020

WordPress Cheat Sheet
Basic Template Files
| File Name | Description |
|---|---|
style.css | style sheet file |
index.php | home page file |
header.php | header content file |
single.php | single post page file |
archive.php | archive/category file |
searchform.php | search form file |
search.php | search content file |
404.php | error page file |
comments.php | comments template file |
footer.php | footer content file |
sidebar.php | sidebar content file |
page.php | single page file |
front-page.php | latest posts or static page |
tag.php | display tags in archive format |
category.php | display categories in archive format |
HTML CSS Snippets
Adding page breaks to your web pages
<html>
<body>

This is the text for page #1.

<p style="page-break-before: always">

Page #2...

</p>

<p style="page-break-before: always">

Page #3...

</p>

</body>
</html>
Wrap text in a <pre> tag
<style>
  pre {
    overflow-x: auto;
    white-space: pre-wrap;
    white-space: -moz-pre-wrap;
    white-space: -pre-wrap;
    white-space: -o-pre-wrap;
    word-wrap: break-word;
  }
</style>


